Monday, January 31, 2011

{A New Twist on my Old Frame}

We moved into our new (to us) home about 6mths ago, which, as anyone who has moved before knows, that means that things that worked well in the old home don't always have a great place in the new home.
So this empty frame that I bought at an antique shop years ago just sat for a few months. 
It originally had antique kitchen items hung "inside" it in the kitchen of our previous home. The spacing on the kitchen walls just didn't work for it here, but I REALLY love that frame! My brain started working and I saw a need in our entryway for a coat rack or hooks of some kind, so I found a way to re-use my beloved frame.
I'm thrilled with it!


I found some beautiful "antique" looking fabric  (I love antiques!) and I stretched it across the back and stapled it to the frame. I then added 7 coat hooks across the front. I thought of doorknobs at first, probably my first choice, but honestly in a new town and a new house I just didn't see myself antiquing for a while.
I had a hard time deciding between black and silver at Lowe's, but I'm happy with the silver in the end.
Hubby screwed it to the wall for me and it not only makes a GREAT place for our coats and bags, it 
looks super cute, too!


The bench makeover underneath it is still to come.

Have a happy day!
Deanna

I'm linking up to these parties:


http://sumossweetstuff.blogspot.com/


 The DIY Show Off

Saturday, January 29, 2011

{Denim Girly Purse}

I love it when I can re-use something, or make it over, or change it completely...as long as I don't have to buy anything new!
We typically make these as birthday gifts for my daughter's little friends (age 6), and they are always well received. Don't throw away outgrown jeans! Just make a purse for a little one. :)

Super easy...just cut off at or near the crotch, turn wrong side out, and sew the leg holes closed with your machine. Then embellish any way you want and have fun with it! My daughter often helps me choose the embellishment when we're making it as a gift, which is an added bonus. I always use scraps for the handles, and usually a little interfacing in them as well for durability. Then get creative...scraps of fabric, buttons, glitter glue, you name it. The flowers on this little bag are actually silk scrapbook flowers that I found on clearance several months ago!

Super cute, perfect size for little girls, and it's nearly free. 
Tip: it's easier to sew on embellishments BEFORE you close up the leg holes.
Don't ask me how I know this. ;)


I'm linking up over here...come check it out!
 UndertheTableandDreaming


Take care,
Deanna

Friday, January 28, 2011

{Quick Valentine Makeover}

I was puzzling over where I would put these vine-y deco balls to make room for a V-Day centerpiece when my creative juices started flowing. I didn't need to move these balls at all!

I just added some scrap red and pink ribbon, and cut a strip of scrap heart and red fabric to make bows. I think they turned out cute!

We're already having fun with our mail pouches, too.  (Tutorial here .)
 

Have a great day!
Deanna
Thursday, January 27, 2011

{Photo CD Storage}

ONE child + ONE Mom who loves to take pictures and scrapbook = LOTS OF PHOTO CD'S!!!
I do have some sense of organization to them, because otherwise I couldn't function, but they were getting a little out of hand, and harder to find what I needed.  I realized this a few days ago when I went to retrieve a baby pic for a project.

I wish you could really tell in this pic how high the stacks are! Is this wrong?  (smile.)
So I decided that even though each CD case is well-labeled, when you have that many to go through to find something specific, "it ain't fun".
I knew they needed to at least be sorted by year.
And then a lightbulb went off...4x6 acrylic photo frames as file tabs. Yay!!!!!
They're sturdy and the stand fits right under a few CD's for support.  I had a few lying around, but needed a few more, so I picked them up at $1 each, added a year tag with painter's tape (so they're still photo-ready if need be in the future), and they sit perfectly as plastic file tabs to sort my years!
My photo CD's are in a plastic tub, which still works well...each CD was labeled with the event/date/etc....but they still needed one more step for organization. This worked out really well, and only took 15min. to get pulled together.
Voila! I find that I always know what year I need, so this makes it much easier to find what I'm looking for. 
Hmmm....I think we took waaaaaaaay too many pictures in 2009! 
Hope this gives you a little inspiration to organize something at your house, too!

Deanna

Check out this linky party!
Photobucket

Tuesday, January 25, 2011

{Burlap Heart Pillows}


I was making a few more little felt heart pillows and a lightbulb went off that I needed something to make them a bit more rustic. Why not toss them into a bowl with BURLAP hearts??! Hello!! I love how they turned out. My home is all about primitives and antiques, so burlap fits right in.

I cut the burlap and some solid red cotton with my standby Nestie hearts (second from the largest I think). Then I stitched them together with red thread, leaving an opening. It actually took more stuffing than I thought, but still not much to fill them. You need a solid color fabric to go between so the stuffing doesn't fall through the burlap.


Then I finished stitching them up and voila! I love how they turned out. When we get our V-Day centerpiece up this week, I'll post a full pic of all of them together. 
I think this could be cute as a framed wall hanging, too. Cut a larger heart with 1 piece of burlap and 1 piece of red or pink cotton, stitch them together, then frame it. Try it and link me up!

Take care!
Come check out other great crafts over at Life as Lori

Deanna


Monday, January 24, 2011

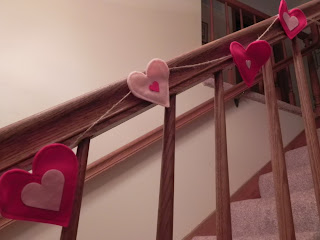
{Valentine Heart Garland}

I'm still feelin' the Valentine vibe!
I made a felt leaf garland back in the Fall that I fell in love with, so I decided to translate that same idea for V-Day. My banister needed some love!
If you have die-cut capabilities, this project was SUPER easy, and if not, it's just easy!
ITEMS YOU NEED:
Heart templates or die-cut(s)
Felt
Jute Twine
Fabric glue
Needle & thread
Sewing machine (optional)

Using my Cuttlebug, I started by cutting the largest heart in my Nestabilities heart stack. I use my Nesties a LOT!
I cut 16 of the largest heart in both red and pink felt that I had on hand.
I used 2 hearts for each space on the garland, just to make each one a little heavier and to look a little more finished.
You could easily do the same just by finding a heart template, tracing your felt, and cutting them out individually. You also don't have to double them.
Then I cut out smaller hearts in coordinating pink and red to add to the front of the larger ones. I then sewed the doubled large hearts together on my machine.
I added the smaller hearts to the fronts with Aleene's Quick Grab Glue. It was late and I didn't want to sew in a small area, ha! You could easily hand or machine stitch these on as well. The glue worked for me though!
Then I rolled out my trusty jute (I swear I use this on a ton of projects!) and just hand stitched it to the top back of each heart. I like the rustic look and feel of jute twine!
Hang and enjoy! Easy and inexpensive "love" for a banister (or fireplace).
Thanks for stopping by and email me if you have any questions!

Deanna


Sunday, January 23, 2011

{Valentine Word Fun}

I've been working on Valentine crafts non-stop the last few days...just too much fun not to!
After seeing some framed art using heart punches, I got inspired to do something just a little different with fun Valentine words. This little activity will be a fun little game for all of us, as well as word and reading practice for the kiddo!


So...I busted out my handy-dandy heart Nestabilities and ran some scrap paper through my Cuttlebug until I had about 35 or so little hearts.  (If you have a die-cut machine, use the coupons at Michael's & Hobby Lobby to stock up on Nesties. I use them all the time!)  I programmed each one with a Valentine word, thinking of short sentences along the way. I think we'll have a great time with these, and practice reading, too. Easy, fun, and a scrap buster, too!


Thanks for stopping by!

Deanna

Saturday, January 22, 2011

Easy Craft {Work Surface}

I don't know about you, but when I'm stamping and scrapbooking I do a lot of antiqued edges and can make an inky mess! A few years I started buying the giant desk calendars on the Dollar Spot at Target to cover my work area. They are terrific and I only spend a few dollars a year. I keep one on my craft table at all times, and when it's finally just too inky or curled for me to look at, I just rip it off and I have a fresh page to work on.
So as you can see...it's NEVER used as a calendar!  I usually buy 2-3 at a time, so I only end up buying them once a year or so. As an extra bonus, my kiddo gets to use the backside for extra drawing paper when she deems it necessary. (Of course you need a big page for such a big bee!)
Thanks for stopping by!

Deanna

Friday, January 21, 2011

Project {Organization}

How do you organize your tutorials, project ideas, patterns, or project plans?  I'm not sure how others do it, but I would go crazy if things weren't organized in my craft room!  I started these binders a year or so ago, although at that time they were mostly just that....binders with lots of STUFF! I find that I print out LOTS of great project ideas and tutorials from all the blogs I follow and they really need a home.  Inside I have sections divided with labeled tabs, but until now the contents weren't easy to see at a glance. I can't believe I didn't do this before!

So today I took a few minutes to print out (and distress of course, hee-hee!) some cover and spine labels. I designated one for sewing projects, two for paper crafts of all kinds, and one with just kid crafts or things FOR kiddos. They turned out cute AND organized, and I'm surprised at how much happier I am looking at them on the shelf!


And a cute font, huh?  I've picked up tons of great FREE fonts over at Free Scrapbook Fonts . They make every project just that much cuter and pulled together!

Thanks for stopping by!
Deanna

Thursday, January 20, 2011

A Little {Love}

          I whipped up these little Valentine Mail Pouches in just a couple of hours thanks to the super easy tutorial here from At Second Street. You need to stop by and check it out because these are ADORABLE! I feel like making one for every kid I know!!


I love ANY holiday since I became a mom, don't you??!  They are way more fun and I find myself going all out for each and every one. I've got a pile of die-cut hearts just waiting  for sweet messages to fill these bags starting Feb.1.
     Besides embellishments, I changed this slightly just by adding snaps instead of buttons. I had them on hand and I haven't learned how to do a buttonhole with my machine yet. I didn't have the time for learning something new today, so the snaps were perfect and I actually like that they are secure but simple to undo from the chairs.  These were sooooo quick and easy (again, thanks to the tutorial here ), that I decided to make one for me and my sweet hubs, too. We'll hang these on the backs of our kitchen chairs come Feb.1. My kiddo will love writing notes for us everyday, and I know she'll love checking hers, too! It will definitely make Valentine's Day just a little more special around our house, and we can pull them out to use year after year.
     Love is in the air... (along with all the snow!)  Thanks for stopping by!

Monday, January 17, 2011

Jungle Playmat Fun

     I made this cool felt jungle playmat a while back for my kiddo, and I'm so happy with how it turned out!  She's 6 1/2, but has an imagination that won't quit and LOVES playing with all of her Schleich (and other) animal figures. She wants to be an animal rescuer and a vet. Isn't that precious?  We found that we were constantly cutting out blue construction paper for water, making toilet paper tube trees, and shredding green paper for grass ALL. THE. TIME. Yes, that was creative and fun, but after the 100th time of doing that I decided to try something more permanent. I love to make things with fabric just as much as I do with paper, and I have a total of MAYBE $5 wrapped up in this project.
     For this project you need: 
felt, needle, thread, batting, sewing machine

I started with a square of green felt and just began randomly sewing on the first jungle "parts" I could think of, using both machine and hand-stitching. The pond was the first, then the log (right corner) which I just held in place and sewed along the sides to make a tunnel. The cave was the trickiest part and it took me a while to get just the right position. I honestly couldn't describe how I did it! I just kept twisting and turning until I liked it. I still think it could be a little roomier on the inside. For the trees, I rolled the chocolate felt piece and hand-stitched together into a tube, then hand-stitched them to the green base using a blanket stitch both times. I then added a chocolate brown "top" to the trees before adding the leaves randomly around each one.  I thought both light brown and green would make good jungle grasses, so I layered a piece of each, sewed right down the middle with my machine, and snipped the edges to the seam and fluffed them up. Can you tell what the little mound is? It's a meerkat mound, with pretend holes for the tunnel openings. :)  I added batting underneath before sewing it closed all the way. Once I had the top all finished, I added a second layer of green felt to make the base sturdier and machine-stitched all the way around. I really love how it turned out!


The little red and white square of fabric in the one picture is not attached. It's just a "picnic blanket". Jungle animals DO have picnics...you know this, right?
     Email me if you have any questions about making one of these for a little one YOU love. Thanks for stopping by!


Friday, January 14, 2011

Gotta Start Somewhere

     My first blog post! I have no idea where this will lead. I know where I imagine it will go, so I hope it does! I find that I want a place to record the cool things my daughter and I do together at home, as well as my craft and decorating projects, hence this blog has been started. I'm a bit clueless, but anxious to watch it take shape.  Everything has to have a 'start', so here I go!
     We had two GLORIOUS  school snow days this week so we filled them with fun and learning at the same time, the two favorite things for my teacher brain. I think snow days are the best days of the year - completely spontaneous, no commitments, and totally open to whatever you want them to be!
     We started with pinecone birdfeeders...nothing new, but fun nevertheless. Literally STILL in her nightgown, the kiddo and I made 5 feeders, then threw on our boots and coats to hang them outside. I think everyone has made these, but just in case you haven't you need pinecones, peanut butter, yarn, and birdseed. Just layer your pinecones with peanut butter, roll in see, and wrap a string/yarn around the top to hang outside.  We had some delightful bird watching a few hours later! Then we took some black construction paper and caught snowflakes together on the deck, checking out all the differences and details we could see in them. We put our science minds to work on our second snow day with some Snow Science. First we wrote down our questions about snow: How fast does snow melt? What is snow made of? How long can I hold a handful of snow? We made predictions, then collected snow (stay away from the yellow, ha!) and put a cup or so in three bowls labeled "Counter", "Fridge", and "Freezer". We started the clock and started watching, checking each bowl every few minutes or so. Our "Counter" bowl made it 51 minutes before being completely melted. Our "Freezer" bowl is still there. The kiddo was only able to hold a handful of snow about 15 sec before the cold got to her, so I won that contest! We finished up our snow days by reading out of our "Winter Book Basket". Snow Days are my fave days with my fave kiddo!