Monday, February 28, 2011

{Inspiration Strip}

As I was streamlining a few things in my craft room this weekend, I realized that I like to pick up little things...quotes, movie tickets, memorabilia...and then it tends to "hang" somewhere in my craft room until it becomes nothing but clutter! One of my clutter areas are my 5K race numbers, a source of pride and inspiration for me. I ran my first 5K last Spring, ran 2 more with a new PR each time, and look forward to more this year. I keep my race numbers and race times visible to remind that I did it (!) and want to do more. They were previously clipped to my metal shelves, so yesterday afternoon I made a long strip to hang them on. I like it much better!
I used scrap fabric that coordinates with my room, along with some major interface scrap piecing, and stitched it up. I added a ribbon at the top for hanging, then pinned my race numbers to it. It's plenty long enough to add more, because I can easily overlap my numbers more if needed. 

Something like this would be great for pins (Disney??!), or medals on pins (I got tons of those growing up for singing and instruments), or badges of any kind. Even barrettes, although I've seen much cuter ways to display those. At any rate, it works well for me! I'm anxious to add more in the next couple of months.
Thanks for stopping by!

Sunday, February 27, 2011

{Old Drawer Turned Ribbon Holder}

I saw this FABULOUS idea for ribbon storage recently over at Blue Cricket Design. I think it's genius, just like most everything over there! I don't use my ribbon all the time, but I have found that when I can see it, I definitely use it more often. I've looked at ribbon organizers so many times, but never found anything that I liked enough to buy. We found this homeless drawer in our garage a couple of months back, but it never occurred to me that it could be useful until I saw this post. This one doesn't stand on it's own and is pretty shallow...it's definitely not from a dresser...but it works well for this and I wanted to hang it anyway (vs. standing it on a table).

So here's my version:
My sweet hubby added the dowels for me, as well as a little bottom shelf from scrap wood. I can always add one more dowel in the future if I need it.
Here's how the drawer looked when I found it:
I removed the side rails first, and didn't even prime or sand this. It's really heavy wood, and honestly just as a ribbon holder and knowing I was going to distress the edges anyway, I really didn't see the need.
We basically just used the ribbon spools to adjust the dowel placement, hubby added the shelf at the bottom, then I painted 2 coats on before distressing the edges. It works perfectly in my craft space, and holds all of my ribbon. Love it!


The drawer idea has really inspired me to try something totally different with another drawer, and I can't wait! I really need a dresser drawer for that project though, so I'm heading to the junk shop next week to see what I can find!
Take care,
I'm linking up to these great parties!


Photobucket

Friday, February 25, 2011

{My "Whatever" Bag}


I've been wanting to make myself a large bag for so long! I always end up making bags for other people, which I totally enjoy, but then never get around to my own. I just want it for "whatever"...weekend trips to visit family, a few library books...just a general "whatever" bag. Can you tell I'm great at coming up with unique names? ;)  I've made lots of purses, but never a large bag, and I love how this turned out.

Super simple to make...basic bag really...nothin' fancy. I fell in love with this fabric while working on a purse for my MIL, so I bought extra for the day when I would have a chance to use it for myself.  This one has a snap closure. They are just too easy to use to pass them up!

I guessed at what measurements I wanted and went with the following:
Body: 20" x 18", with 4" boxed corners
Interface slightly smaller all the way around
Snap closure: 3" x 6"...and it's actually right :)
Straps: 4" x 26" (with interface as well)

About a 1/2" seam allowance. I used a double-row of stitching on the straps and around the top, just for something a little different.

I didn't add any pockets to this bag...not sure why...just didn't this go around. I think I'm going to make a little fold-over wallet to store my running library "to get" list.
I really like how it turned out! Whatcha think?

Now can someone please teach me how to "ease in a sleeve"?! (Tee Hee) But sadly, I'm not kidding.
I just.don't.get.it. There must be something missing in my brain for it!
Oh well...this AG doll robe might be lying in a half-finished state for years to come. :)
Thanks for stopping by!
I'm linking up to these great parties:
 UndertheTableandDreaming
 Fingerprints on the Fridge...Feature Yourself Friday
Fancy This
Stinkin Cute Thursday Button

Wednesday, February 23, 2011

{Altered Curtain Panels}

  We moved into our new-to-us home about 7mths ago and it's really starting to feel like ours. Yay! Our office/bonus room has one window, which is covered with new faux wood blinds. I've pledged to keep that room pretty masculine for my hubby, and he has lots of his football collectibles/memorabilia in there. I had these new but el-cheapo heavier panels that I found on clearance at Walmart while we were between houses and renting last year. Masculine, striped, right color scheme, so I decided to cut them off to make a valance.


You wouldn't know it, but they are tab top, which I didn't like the look of in this room. So first I took them from tab top to rod pocket with my Aleene's Quick Grab Tacky Glue. 


This took about 5 minutes of gluing, and I waited another hour or so before hanging them.

Then I measured how long I wanted the valance to be, cut them off, and sewed a thin 1/4" hem along the bottom. I did this with both panels because one wasn't thick enough along the window.
They look great and I'm always proud of myself when I use something I already have.


These were brand new for about $6 at Walmart, again purchased last year to cover a french door in our rental. These are the deals you need when you are paying both a mortgage and rent! :) But they actually turned out neat in the end, so if you see something too big on clearance at Walmart, you never know what you might be able to turn it into.
Take care!

Sunday, February 20, 2011

{Impromptu Dog Beds!}

Out of nowhere I whipped up these doggy beds this afternoon and they are already getting some serious sleep time! My sweet JRT's, Riff & Shelby, are by my side constantly (and I mean CONSTANTLY). That means that I always have 2 buddies sleeping around my feet when I'm in my craft room working on something. The last few months, they have both taken a liking to sleeping on anything that's fleece. So a month or so ago I purchased a 2 pack of those super-cheap thin fleece blankets at Wal-Mart for about $3. I specifically bought them in chocolate brown so they would blend in with my living room decor. One is there and the other I cut in half and had thrown in my craft room. That means it's been first come-first serve on the fleece in there.

This morning Riff was left out and looking for something soft to lie on. I remembered a large section of super soft material that I bought once with the intention of making a baby blanket for a friend. That never happened and never will, so I threw it on the floor. He fell in love so I decided to turn that and the brown Wal-Mart fleece into beds for them...just for the craft room. :) (Any other time they are snuggled up beside you on the couch.)

I just folded them in half, stitched around 3 sides, then lightly stuffed with poly-fil before closing them up. Neither fabric needs to have a finished edge, so it was super quick.


They both like to dig around and make their blankets "just right", so the uneven poly-fil works perfectly. These cost next to nothing and no one gets left out of a soft place to sleep now in my craft room. :) Strangely, they even inadvertently almost match!

I like how easy they were and how happy my puppers are! 

I'm linking up at:


Photobucket


freckled laundry UndertheTableandDreaming 
Photobucket


Fancy This

Thanks for stopping by!

Saturday, February 19, 2011

{Hiccups}

Not much happening with my crafty side this week. I'm home with my sick kiddo, staring at my Lowe's supply list on the kitchen table, wishing I could get out to purchase all of it! Sick kid actually means tons of free time while I'm just "on call" for necessities, but right now I'm lacking a few supplies to start on some of my projects.  I did semi start scrapbooking the first page of our recent trip to Disney World, but somehow I'm out of 12x12 kraft paper, too, and that's what I need to finish this page. Sounds about right!

So with nothing getting accomplished this week and a long list of projects brewing in my head, I'll leave you with this sneak peek. I have some great plans for this old drawer we found in the garage. I'm just itching to get it started. I wish I could teleport to Lowe's! :)
Have a good one,

Wednesday, February 16, 2011

{Organizing Recipes}

There are a million great ways to store recipes, so really you have to find what works best for you. I've seen super cute binders that I would have a blast putting together and decorating, but the bottom line is that I wouldn't want to ever get one speck of anything on it in the kitchen. Therein lies the problem!
So I continue to use my 4 x 6 Longaberger Recipe basket from a decade ago and it still works well for me. I was looking for a recipe yesterday and realized that it had been quite some time (as in YEARS) since I've gone through my recipe box and cleaned it out. When I couldn't get the lid back on, I knew it was time to do just that. I'm going to apologize in advance for dark pics...I'm playing with camera settings! Here's what works for me!
So here's my recipe box. It also has the matching lid. It can be anything of course, but I've had this probably 10 years and I like how it looks on my countertop and honestly, it just works for me!
I have each recipe printed out on blank 4x6 cards like this:

You know when you see a magazine pic of a cute treat? I just cut those out and adhere them to a 4x6 card as well...along with any note if necessary. Some like the following are really self-explanatory, but I need the pic for future reference!

Then I designated one 4x6 card to be my "divider" and I used self-stick Avery tiny file tabs. These are my categories:
Chicken     Breakfast     Desserts     Halloween     V-Day     Easter     Xmas
Kids & Misc     Beef/Pork     Seafood     Sides     Mexican     Dips,Snacks, & Drinks
My "Kids & Misc" tab has things like playdough recipes, homemade dog treats, and hummingbird food. That kind of thing.

It keeps me organized, I can find what I want really easily, and especially for holiday treats (all of them!) I find that I go right to my recipe box when holidays roll around. It's also easy when I find a cute treat idea in a magazine, I can clip it, stick it to a card, and file it right where it goes.
I'm sure there are plenty of cool methods for recipe storage, but this one works so well for me I wouldn't change it at this point.  What do you use?

I'm linking up over at:

Tuesday, February 15, 2011

{Craft Room - Part 3: Finished!}

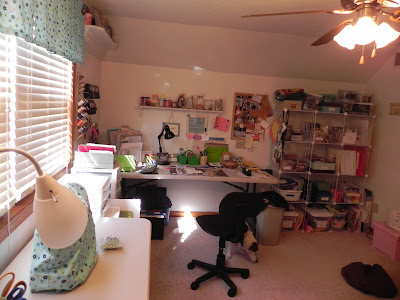
To complete the sharing of my craft room, here are some pics that pull it all together. I'm blessed to have a room all to myself, but it wasn't always that way and certainly isn't necessary. Just a corner or small section of any room or closet will serve the purpose well. Here it is!  :)


I have a 6ft table for the majority of projects, and a 4ft sewing table...although I'm currently hunting for an old desk to refinish for my sewing area. My 4ft works just fine, but it is a bit shaky at times, and I know a solid desk would "feel" better overall. It has served me well though.

I don't know about you, but I like to fill my space with photos! No surprise, since my home is loaded with framed photos, so the craft room is no exception. I have lovely chunky crown-molding-type shelves on either side of the double window, so I filled those with framed photos I love.  I also use the side of my Target wire shelves to hang art work, quotes, and my 5K race tags. They keep me inspired!
 Aren't these cool?

I have an over-door wreath holder where I currently keep the bags/purses I've made until I give them away. This seems to be working well for now, but if I start selling, I'll need a better method.

I see so many wonderful organization and decorating ideas for craft areas, and they really all are an inspiration. I think the key is finding what works for YOU, and will keep your stuff accessible and easy to find. Have fun in your own craft spaces, and send me your links to share. I would love to see them!!
If you have any questions, feel free to email me anytime.
Thanks for stopping by!