Sunday, October 16, 2011

{Freebie Halloween "Tree"}

Have you seen those really cute gnarled, scary-looking tabletop trees? You know, the ones you add little Halloween ornaments to? I almost bought one of those, and then remembered that I have 24 trees in my yard. :)
So we grabbed some branches on a nature walk, stamped some spooky images, and adhered them to scraps from my Halloween Countdown Calendar. I added some candy corn for color, and because hey...you know I love candy corn. 
Why is it that there's something I just love about dead branches in a vase in my home?
 I used a jack-o-lantern face stamp for this one, and punched out the oval to make my own ghost. Can you tell this took 5 minutes?


My vase is $1 Store of course. Love it...I think we will do these every year from now on!
Happy Haunting!

Making

Friday, October 14, 2011

{Treats!}

I love, love, love to make up treats for just about any holiday. I often have not NEARLY enough people to give them to, but darn it, I love to make 'em! Halloween is, of course, my fave.
I made up these really simple little treats for the staff at my school, as well as for my daughter's classroom teacher and teachers of specials (art, music, library, etc.). 
Really easy!
I used the little ziploc bags from the jewelry making section. MUCH cheaper than cello bags, and you get a million in a pack. They are the perfect size for a Reese's Cup, or a few Hershey's Kisses, etc. 
To make the tops, I die cut the Stampin' Up Top Note die, then folded it in half. If you don't have this die, get it...no, seriously...it's really versatile. BUT...if you don't have it, you can use a circle or square folded just as easily. 

Slide the die cut over the top, center it, and add a staple in the center to keep it on.
(You can also add the die last, and staple it on either side. I did a few of those and I think they look great with side staples, too.
Then add a sentiment on top of the staple. I have a great older Halloween set from Stampin' Up that is really versatile. It's my go-to Halloween stamp set, because I can stamp tons of images and punch them out easily with my circle punches.
See? No staple showing.  :)
Now I just have to wait a few weeks to give them...which is the hardest part!
Happy Treating!

Wednesday, October 12, 2011

{Halloween Countdown Flip Book}

Been a little crazy 'round here since I started teaching preschool 3 mornings a week. After 7 years of being at home, it's a bit tricky to get back in the swing of working, even just part-time! I'm enjoying it though, and finding my crafting time to be even more rewarding right now as I work to carve out time in smaller portions than before.
I saw this really cool Halloween Desktop Countdown Calendar a few weeks ago over at The Polka Dot Chair. I put it on my to-do list and within the week I had it finished. I had SO MUCH fun making this project!! I followed the really easy tutorial and I {love} how it turned out. I had not made a flip book like this before.
I made a few changes to accomodate my own book. Instead of buying pre-packaged chipboard, I cut my own out of cereal boxes from my recycling bin. Believe me, it is the perfect "chipboard", and I've yet to buy the real thing for any of my chipboard projects. So dig through your recycling!  :)  I cut each page to 8x8, and for that size, I needed the super size boxes of cereal (which I always buy).
I picked up a huge page of cardstock Halloween shapes from K&Co. (on sale) for around $3, and the rest of the papers were from my Halloween stash (which is hefty because it's my favorite holiday!)
I adhered each piece of scrapbook paper to the cereal boxes with Tombow glue. The back of each page is simple black cardstock. Most of the embellishments are also glued on with Tombow, although I also used snail for a few things.

I went through old photos and snagged 10 that I thought would be great in the book. I really liked how they looked as B&W in the tutorial , so I easily converted them all to grayscale using my Irfanview. All of the photos started as 4x6, and then I trimmed them as needed.

(above) One of my favorites!
The best part about this project was that since I actually wasn't recording any memories with words/journaling (like I do in my regular scrapbooks), I could just DECORATE each page. That was ALL I had to think about. Don't get me wrong, I {love} to record memories, journal, and find a way to get masses of photos in a small spaces on 12x12 pages, but just being able to create pages simply for the cuteness factor was a really nice change.
(above) My baby's First Halloween!  (sniff, sniff)
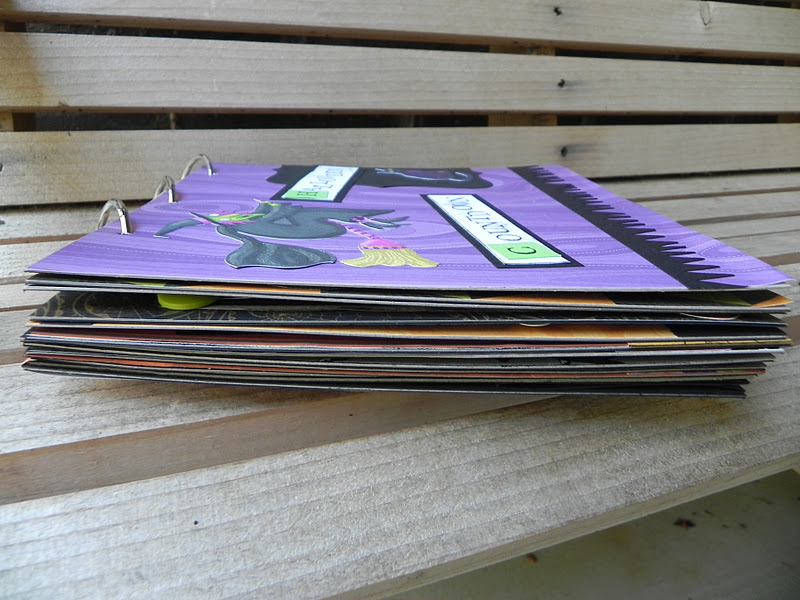
And here's a pic of the book when it's laying flat:
I had a side view of the 'stand up' part, but it disappeared somehow. You can tell that it stands up, and really the tutorial is super easy.

I think I'm going to make something similar for Christmas!
Thanks for taking a look,

Friday, October 7, 2011

{Garage Sale Makeover}

I picked up this GREAT table at a garage sale a couple of months ago. It was one of those wonderful near accidents where you're driving along and literally hit the brakes in the middle of the road because the light has just poured out of heaven right onto a table at a garage sale! LOL
I've been wanting something for our bonus room, to replace the plastic Little Tikes table that my kiddo is squeezing herself into these days. I was out of town when I bought it, so I had to disassemble the whole thing to get it home...meaning I don't have a good before picture. :(
But I do have a good after picture... it was originally baby blue, but in excellent condition.
I actually sanded it down quite a bit on the top...really as a complete amateur thinking I NEEDED to do that. Now I realize I didn't need to. Oh well...I got sandy. :)  I used leftover paint from my bathroom, and I did 2 coats (no primer). I actually planned to distress it afterward, but I liked it so much the way it is that I didn't bother.
These are a few of the before pictures...disassembled:

I sanded down the chairs just a bit, but kind-of went to town on the table top. Again...I realize now that is wasn't needed, but we live and learn!
Oh, I forgot to mention how much I paid for this little beauty...a whopping $27!! It is super sturdy, in excellent condition, and folds down on the sides. It's perfect for our bonus room...for homework, playing games, and it's the right size for everyone. (Goodby Little Tikes, LOL!)
Have a great day!

Monday, October 3, 2011

{Candy Corn Softies}

Again with the candy corn! :)
I told you I love to look at it, which is a good thing because if I ate this much it would not be good.
I'm  not quite sure what to call these, since they aren't really pillows...so I'm going with softies!
I had a few leftover candy corn pennants that didn't make the cut for my bunting , so I turned them into these:
I only had 3, so they are perfect to place in a little basket on the bathroom sink, or on a side table.
I started with 3 of these...
...and stuffed them.
Then I folded under the top opening, pinned it, and topstitched it with the machine.
I love primitives, so these were just a little too bright for me. I grabbed my Distress Ink and just roughed them up a bit...real randomly.


I love having leftovers...you never know what you might come up with.  :)

Thanks for stopping by my little corner!
I'm linking up to these parties:
Creative Itch

 Making the World Cuter Monday


http://www.iheartnaptime.net/ “>

Wednesday, September 28, 2011

{Bench Makeover #2}

Do you remember THIS BENCH?

My sister-in-law gave it to me a few years ago, originally hunter green with red undertones.
When we moved into this house, I decided it should be black.
You can read all about it HERE.
I lived with that for several months but never really got into the black.
So...I switched it up this week and came up with this:
I really love the color, although I'm still debating on putting a little bit of my chocolate glaze over it...just to tone it down a touch. I know I definitely like it better than the black. Only time will tell of course. :)

I really like the black showing through where I sanded the edges.
Paint is the ultimate home miracle worker!
Have a good one,