Showing posts with label Halloween. Show all posts

Thursday, October 27, 2011

{Canvas Trick or Treat Bag}

I've been busy, busy with my preschool class and extra-curriculars with the kiddo, BUT...I squeezed out one more Halloween project to share with you!
Now we have a candy bag that will actually hold ALL the candy, and look cute, too.
I purchased this canvas bag at Joann Fabrics, with a nice 50% off coupon to boot, making it about $3. I really wanted a cream-colored one, but they didn't have one and I needed to get it made for Halloween!
I opted to use felt scraps, just to make it easier and a real no-brainer. I actually pieced together the center yellow because I didn't have one piece big enough.
I thought it made it look a little scrappy, so I went with it!
I basically machine-stitched it on, and added some scrap orange fabric from my candy corn bunting for the bow.


I think it will hold all the candy this year! :)
Thanks for stopping by,
I'm having trouble pasting code, so here are the links where I am this week:

Sunday, October 23, 2011

{Classroom Halloween Treats}

Well...not really treats I guess.
Won't they be getting enough junk to rot their teeth and minds right around this time of year? :)
So for my daughter's first grade class, we opted for a Halloween pencil instead...and possibly a Halloween fruit roll-up.
I picked up the pencils on the Dollar Spot at Target. I found something similar to this idea years ago, and just made it my own.
It's very simple, but you do need a few tools of the trade. How it comes out though is all up to you!

I cut the base rectangle with a Nestie. I used a slit punch (about $6 and although it's not used often, it's really handy when you do need it!) and put a slit in each short side of the rectangle. These are the slits where the pencil will go.
I hope you you can see them! It's a little tough on the black.
Then I took a favorite old Stampin' Up Halloween set, stamped 20 images, and punched them out with a circle punch. I punched a background for those images with a scallop circle punch. (Are you tired of hearing the word 'punch' at this point?)

Adhere your stamped (or printed) images to the pencil holder rectangle and you're all done.
I know they will get thrown away and crushed, so I didn't add ribbon. I've learned when making papercrafts for kids, it's best to pull back a little so you don't burst into tears when they destroy your pretty project! :)
Just a little classroom 'treat' to pass out at the Harvest Party, and they take very little time to make.
If you have questions, let me know!
(I can't wait until Halloween!!)
Take care,

Sunday, October 16, 2011

{Freebie Halloween "Tree"}

Have you seen those really cute gnarled, scary-looking tabletop trees? You know, the ones you add little Halloween ornaments to? I almost bought one of those, and then remembered that I have 24 trees in my yard. :)
So we grabbed some branches on a nature walk, stamped some spooky images, and adhered them to scraps from my Halloween Countdown Calendar. I added some candy corn for color, and because hey...you know I love candy corn. 
Why is it that there's something I just love about dead branches in a vase in my home?
 I used a jack-o-lantern face stamp for this one, and punched out the oval to make my own ghost. Can you tell this took 5 minutes?


My vase is $1 Store of course. Love it...I think we will do these every year from now on!
Happy Haunting!

Making

Friday, October 14, 2011

{Treats!}

I love, love, love to make up treats for just about any holiday. I often have not NEARLY enough people to give them to, but darn it, I love to make 'em! Halloween is, of course, my fave.
I made up these really simple little treats for the staff at my school, as well as for my daughter's classroom teacher and teachers of specials (art, music, library, etc.). 
Really easy!
I used the little ziploc bags from the jewelry making section. MUCH cheaper than cello bags, and you get a million in a pack. They are the perfect size for a Reese's Cup, or a few Hershey's Kisses, etc. 
To make the tops, I die cut the Stampin' Up Top Note die, then folded it in half. If you don't have this die, get it...no, seriously...it's really versatile. BUT...if you don't have it, you can use a circle or square folded just as easily. 

Slide the die cut over the top, center it, and add a staple in the center to keep it on.
(You can also add the die last, and staple it on either side. I did a few of those and I think they look great with side staples, too.
Then add a sentiment on top of the staple. I have a great older Halloween set from Stampin' Up that is really versatile. It's my go-to Halloween stamp set, because I can stamp tons of images and punch them out easily with my circle punches.
See? No staple showing.  :)
Now I just have to wait a few weeks to give them...which is the hardest part!
Happy Treating!

Wednesday, October 12, 2011

{Halloween Countdown Flip Book}

Been a little crazy 'round here since I started teaching preschool 3 mornings a week. After 7 years of being at home, it's a bit tricky to get back in the swing of working, even just part-time! I'm enjoying it though, and finding my crafting time to be even more rewarding right now as I work to carve out time in smaller portions than before.
I saw this really cool Halloween Desktop Countdown Calendar a few weeks ago over at The Polka Dot Chair. I put it on my to-do list and within the week I had it finished. I had SO MUCH fun making this project!! I followed the really easy tutorial and I {love} how it turned out. I had not made a flip book like this before.
I made a few changes to accomodate my own book. Instead of buying pre-packaged chipboard, I cut my own out of cereal boxes from my recycling bin. Believe me, it is the perfect "chipboard", and I've yet to buy the real thing for any of my chipboard projects. So dig through your recycling!  :)  I cut each page to 8x8, and for that size, I needed the super size boxes of cereal (which I always buy).
I picked up a huge page of cardstock Halloween shapes from K&Co. (on sale) for around $3, and the rest of the papers were from my Halloween stash (which is hefty because it's my favorite holiday!)
I adhered each piece of scrapbook paper to the cereal boxes with Tombow glue. The back of each page is simple black cardstock. Most of the embellishments are also glued on with Tombow, although I also used snail for a few things.

I went through old photos and snagged 10 that I thought would be great in the book. I really liked how they looked as B&W in the tutorial , so I easily converted them all to grayscale using my Irfanview. All of the photos started as 4x6, and then I trimmed them as needed.

(above) One of my favorites!
The best part about this project was that since I actually wasn't recording any memories with words/journaling (like I do in my regular scrapbooks), I could just DECORATE each page. That was ALL I had to think about. Don't get me wrong, I {love} to record memories, journal, and find a way to get masses of photos in a small spaces on 12x12 pages, but just being able to create pages simply for the cuteness factor was a really nice change.
(above) My baby's First Halloween!  (sniff, sniff)
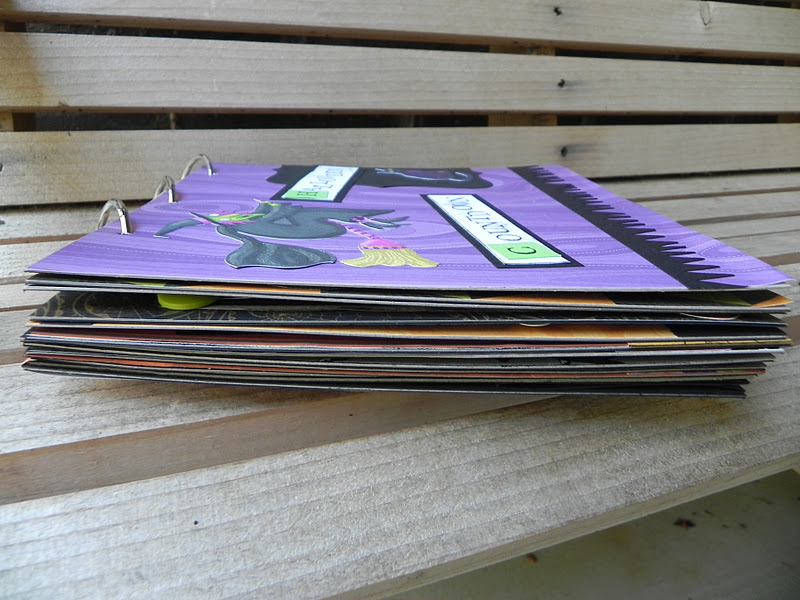
And here's a pic of the book when it's laying flat:
I had a side view of the 'stand up' part, but it disappeared somehow. You can tell that it stands up, and really the tutorial is super easy.

I think I'm going to make something similar for Christmas!
Thanks for taking a look,

Monday, October 3, 2011

{Candy Corn Softies}

Again with the candy corn! :)
I told you I love to look at it, which is a good thing because if I ate this much it would not be good.
I'm  not quite sure what to call these, since they aren't really pillows...so I'm going with softies!
I had a few leftover candy corn pennants that didn't make the cut for my bunting , so I turned them into these:
I only had 3, so they are perfect to place in a little basket on the bathroom sink, or on a side table.
I started with 3 of these...
...and stuffed them.
Then I folded under the top opening, pinned it, and topstitched it with the machine.
I love primitives, so these were just a little too bright for me. I grabbed my Distress Ink and just roughed them up a bit...real randomly.


I love having leftovers...you never know what you might come up with.  :)

Thanks for stopping by my little corner!
I'm linking up to these parties:
Creative Itch

 Making the World Cuter Monday


http://www.iheartnaptime.net/ “>

Monday, September 26, 2011

{Twine Candy Corn Pennant Wreath}

That seems like a lot of buzz words in the title, no?! LOL
We put up our Halloween decorations over the weekend and I've been adding to them like crazy. Did I mention this is my VERY favorite time of year??!! I'm so nuts about Halloween!
I made a few simple twine wreaths last year, and didn't add any embellishment except a ribbon for hanging.
I don't have a before pic of them, but I found the tutorial over at Brown Paper Packages.

After making some Candy Corn Bunting , I saw my scraps lying on the sewing table and the empty twine wreath and I knew I needed to do something else 'candy corn' with them!
I think it turned out cute and was no-sew, too!
If you want to make the wreath, you need a foam circle and I used jute twine. You can see the easy tutorial over at Brown Paper Packages. Once you've made your wreath, you're ready to go!
I started with this:
Some strips of leftovers and an empty wreath.
First I sewed my strips together in a candy corn pattern, just like with the candy corn bunting, only much smaller.
Then I made myself a small penant template out of old file folder, traced it onto my candy corn fabric, and cut out a few.
They are tiny!  :) Too tiny to sew, and I wanted this to look a bit 'rough', so it works out perfectly.
Next I used Liquid Stitch to adhere my candy corn pennants to a length of hemp cord.
My wreath is a smaller one, so 3 pennants was plenty.
Then I wrapped the ends of the hemp cord around my wreath, and secured them with Liquid Stitch. I angled the whole cord a bit. I added a last strip of leftover fabric (already cut to size as is) to use as my hanging ribbon. Again with the rough edges that I love. :)
And there you have it. It looks great hanging inside my front door, and I got to use scraps! Score!
Funny thing is that I don't even really like to eat candy corn...I just like looking at it. ;)

Have a wonderful day!