Showing posts with label play. Show all posts

Friday, February 10, 2012

{DIY 18" Doll Sleeping Bag}

So now that we have TWO American Girl dolls, they will be having sleepovers. :) We have one beautiful handmade doll bed that you can see a little bit of here.  My father-in-law creates beautiful wooden furniture, so we are fortunate to have a bed, table and chairs, and school desk for FREE. (That's the only way we would have those things, believe me. Yikes on the prices!) So, it's actually wide enough that both dolls can sleep side-by-side, but when they are camping out they really need a sleeping bag. ;)
Again, price the "real" thing and.....it ain't happenin'. My OWN sleeping bag cost only a little more than that. So I grabbed some purple fleece from the clearance remnant rack at Joann's and got started.
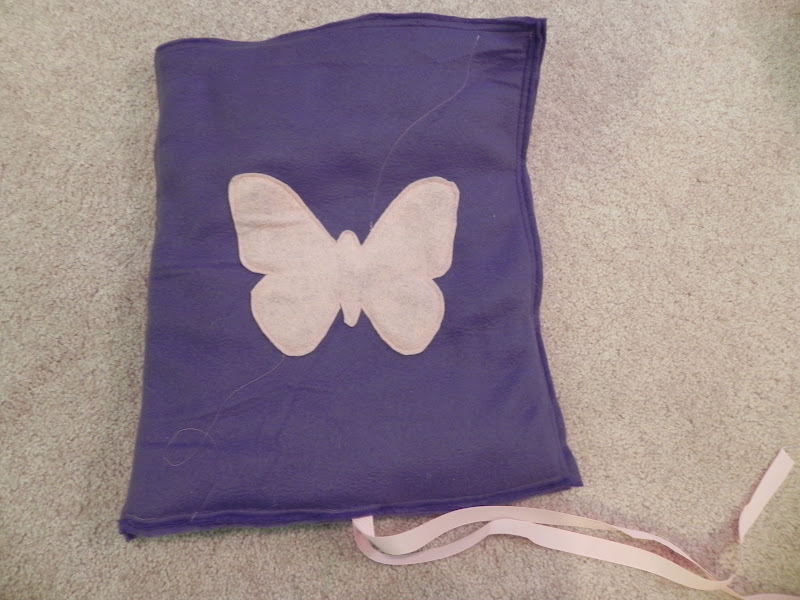
I measured it just by laying the doll down and guessing. I think it turned out pretty well. I sewed together 2 pieces of purple for both the front and back side, sliding a thin piece of cotton batting between each of the two pieces. This makes it feel more like a sleeping bag, and it's SO SOFT I want to sleep in it! This doll is camping in luxury!
I sewed scrap ribbon inside of the top piece to use as the roll-up tie. I also sewed velcro along the side, but not the full length of the sleeping bag.
I made a little pillow that you can tuck inside before you roll it up. I kind-of wish I had just made the back piece longer, but it's fine this way, too. Live and learn!
I used scrap felt to make the butterfly on the front, and stitched a swirl design freehand to look like the butterfly 'flutter'. It's hard to see that part in this picture.
It rolls up nicely and tucks away so it doesn't take up space (and it's easy for her to carry of course).
This cost me about $6 total. The purple remnant I bought was MUCH more than I needed, but it was cheap and I figured I would use it for another project later on. The 'real thing' is in the $30's, without S&H, so I'm counting it as a score.
And look....she must like it because she's sleeping so peacefully!
I have so much fun making things for my kiddo to play with, and even more so when it's soooo much cheaper than buying the same thing! I'm rewarded with gratefulness from a sweet girl, and that's really the best part.
Email me if you have any questions about it!
Thanks for stopping by,

Monday, June 13, 2011

{Stick Pony Tutorial}

My sweet girl is turning 7 in just a couple of weeks, and her party theme this year is horses. She loves all things "horses" at the moment, so all the party prep is in the works at the moment. We love to do themed parties - It's so much fun getting creative with all the details. I'll be sure to share all the party specifics afterward, but for now I wanted to share my tutorial for the homemade stick ponies I made for her party with her classmates. We plan to have stick pony races of all varieties, so the stick ponies will double as a favor for each girl, as well as part of our party fun!  I looked around for homemade stick ponies, got a few ideas, and here's what I came up with. They are really simple to make! The hardest part was getting my pattern just right, and that still only took a couple of tries and testing on some scrap fabric.  This is one of my first tutorials, so I hope it's clear for you! If you have questions or I've left something out, I apologize in advance and please email me so I can correct it! :)
Here's what you need:
2 buttons
1/2yd fabric
 sewing machine
thread
poly-fill
3ft dowel rod at about 1/2" diameter
yarn of your choice
needle
jute twine or ribbon
  a horse head/ears pattern.

I drew my own horse head pattern on old file folders and made one or two samples to make sure the sizing was right. I am no artist! :) I really just free-handed a horse head until it looked right.
Here goes! :)
1. Trace the horse head and 2 ears onto your fabric, with right sides together. Pin in a couple of spots for security and cut them out.

2. Make the ears:  You will have 4 ear pieces all together, to make 2 full ears. Pin ear pieces in pairs, right sides together. Machine stitch on two sides, then turn right side out. Top stitch the bottom closed and all the way around. Hand stitch a little tuck in the bottom of each ear so they look like this:

3. Mark a spot on each horse head piece where your button eye will go, and hand stitch each one on.
 4. Cut several yarn  pieces about 7"-8" long each. I would say my horses have about 12 strands per head, but use as many as you like. I had to make 9-10 of them, so I skimped a little and still used a whole skein. I think they look great with a heavy mane, and I would definitely increase mine if I were only making one or two. This is what I used:

 5. Now it's time to sew your horse heads together. Lay out one horse head, right side up. Line up your yarn pieces (the mane) flush with the neck of the horse head, laying them over the fabric so that they will actually be stitched up into the horse head. I made sure that the mane also went up through to the ears as well.  Once you have them there snugly together, fold up the ends of the strands so they are INSIDE the neck like this:

Once you have your horse head sewn together, then the mane will be where it should be once you turn it right side out.

6. Lay the second horse head piece on top of the first one, right sides together, and pin securely along the sides. 

Machine stitch all around, about 1/4" seam allowance, leaving the neck open. Clip your curves and turn right side out.

7. Hem the neck of your horse head and you will be ready for the stuffing. Stuff your horse head pretty firmly, although not all the way to the bottom of the neck. Play around with it. You can always take some out if needed. You need some space down at the neck for the stick, hot glue, and tying. It will now look like this:
We still need to add the ears, reins, and stick. You're almost done!

8. Hand sew each ear to each side of the horse head. I considered putting these inside along with the mane strands, but I liked the way they looked better doing it this way. By all means, go with what you prefer! :) I took a pic from the back, just to help you see how closely I sewed them together on the head.

9. Cut a 36" (1/2" diameter) dowel rod down to about 28" and sand the end smooth. Place your stick up inside the horse head, trying to keep it squarely between lots of poly-fil so it's not just ramming right into your bare fabric. Add hot glue to the stick, just under the horse neck flap, and press the neck fabric down tightly. Add the jute twine here, knotting it twice, and criss-crossing it tightly around the base of the horse neck.

 10. Now cut a length of jute twine and knot it around the horse's muzzle, just a little too tightly. (You don't want to squeeze the horse's muzzle and make it look funny.) Pull back the loose strand on each side of the head and knot that again to make the reins. I'm not sure how best to get a pic of this, so hopefully you'll understand it by seeing the finished product.
Voila! You have super cute homemade stick ponies! These will be our party favors for about 9 girls. I purchased and used a little over 2 yards of fabric (clearance), the buttons, and the dowel rods @ $1.29each at Hobby Lobby. The thread, twine, and poly-fil I had on hand. All told, I spent about $16 on 9 stick ponies. The buttons were the most expensive. The ones I had just weren't big enough to look right. I used about 3/4" buttons on these stick ponies.
I hope you enjoyed this tutorial and will try one (or 10!) of these on your own. I'm happy with how they turned out, and I'd love to know what you think, too!
Have a great day,
Linking up over here:


Creative Itch


Monday, May 30, 2011

{Clubhouse Makeover}

I've been MIA lately, but have several projects I'm working on! The weather has FINALLY been beautiful and it FINALLY stopped raining, so we spent the holiday weekend getting multiple yard projects out of the way.  Do you love to work in the yard? I absolutely love it... the satisfaction of checking something off our to-do list and admiring the end result.

Our first project was to makeover this "clubhouse". We moved into our 3rd home a little less than a year ago, and inherited the clubhouse from owners several years ago. It had great bones and great structure, but needed a few repairs and some cuteness for my nearly 7-yr old daughter.
It's located at the back of our 1.5 acre property, near the woods.
I had a vision of making general repairs, adding some playset accessories, and a few cuties to make it work for us. We have a wooden playset, but it's smaller. In hindsight, we would have purchased a larger one, simply for a larger "clubhouse" feature. But...with only one child, nearly 7, it doesn't seem cost effective to purchase a new $1K set when we had this clubhouse we could re-work. :)

Here's the finished product. We're happy with it, and best of all, she loves it!

Whatcha think?
For a hair over $100, we made a few repairs,  replaced the flooring, relocated the ladder entrance, and added the safety handles, steering wheel, mulch, and telescope.

 I covered the bottom with a weed mat and filled it in with mulch that matches the rest of our landscaping. She wants to add a few pinwheels at the bottom as well. :)

 We've had these outgrown rainboots on hold for a donation for at least 2 months! I saw an idea recently to use them as planters and I fell in love with it. I have no idea where I saw it, but it's a great idea so we kept the boots just for this purpose.

Now it's a safe clubhouse to play in, which is currently acting as one of the following:
1. a lookout for poachers in Africa
2. an animal rescue truck on the African savannah
or
3. an animal science lab.  :)
Can you tell she wants to be a biologist?

Thanks for stopping by!  I hope your weekend was as productive as ours!


I'm linking up over at:


NightOwlCrafting
Making

 The DIY Show Off

Sunday, March 27, 2011

{Felt Arctic Playmat}

Okay so we had to add ONE more playmat. I tell you I get addicted! I think it's because when you're using felt you eliminate things like right/wrong sides, and you can twist it pretty much any way you want and it will turn out right. Plus it's inexpensive. Plus you can use your imagination and then make it happen!

So...I mentioned while playing with animals that wouldn't it be nice to have a winter-type landscape to play with the polar bears and penguins? My sweet girl gave me the go-ahead and our minds started churning out ideas. How about a snow hill? Definitely an ocean area. Maybe an igloo? Ice chunks?

Here's how it came out:

These projects are great because it's really up to you how you make them, so they will always be different and unique! I basically roughly gathered a rectangle of white for the "snow hill", then machine stitched it down almost all the way before stuffing it. 
I laid out the blue diagonally, free-handed some wavy sides, and stitched it down. I added a few wavy stitch lines as waves, then rough cut a couple of icebergs and stitched them over top.

For the snow cave, I cut a too-big rectangle and basically just crumpled and gathered it around the sides until I was happy with it. I pinned it in place and machine-stitched that, too. 
I added a second layer of white felt to the bottom to make it heavier. I have done that with my Jungle Playmat also. I made one extra iceberg that I didn't stitch down...but I used a triple layer of felt for that. 
Maybe that piece is just floating, so animals can cross from one side to the next?  :)
I'm very happy with how it turned out, and the ease and low cost of completing these. Again, I wouldn't make one out of felt for baby use because felt just isn't conducive to washing. But for a little bigger child I think they're great...and portable!
Here's one other mat that I made several months ago...but it was really just for fun and not for my own daughter. It's more for little ones, maybe? I gave this one away, but I love the portability of making them flat. 


Thanks for looking at one more playmat. :)
You can see my jungle playmat  HERE and HERE.
Take care,
I'm linking up to these parties:
giveaways


Photobucket
 UndertheTableandDreaming

Friday, March 25, 2011

{Jungle Playmat Update}

You may remember the Felt Jungle Playmat I made a while back...an item that has been played with and played with again by my almost 7 year old. She loves to create scenarios with her Schleich animals, and over the last few months she has accumulated several new ones. We decided this week that the original was just getting too crowded, so lastnight I added on.
Here is the original:
You can read more about it here.  I am very happy with it, but the animals had completely taken it over!
I had several large pieces of green felt leftover, so I decided just to add on to the existing mat. 
Here's the new addition:
I added a stream, a field of grasses, and an ostrich nest with eggs (since she recently bought a mother and baby ostrich). I also just left open space for grazing, playing...whatever the imagination can brew up.;)
 For the nest, I randomly cut a rectangle and just started rolling the sides into a circle before hand stitching it down.
 For the grasses, I have found it's easiest to take one longer strip of green, snip inward on both sides to make the grass, then sew it down the middle. You can fluff them with your fingers. Here are the rhinos enjoying grass. :)
 And here's the stream. I was using small squares of blue felt, so I pieced this one together. She has a few real rocks that she usually adds to it, so maybe she'll cover that up.

So I took the new piece and sewed it to one end of the original. I wanted to work with the felt I had and not buy more, so this worked best. She rolls this up when she's not using it, so it's easy to put away when she needs to. I wouldn't use felt with a baby (not conducive to washing!!), but for my almost 7 yr old, it's great.
Here's the final version...maybe. Unless we add more someday. :)


The top half is the original, and the bottom is the new piece.

Whatcha think? I'm starting on another one this evening, for a different ecosystem of animals.
I'll post it, along with yet another version, very soon!
(Can you tell I get addicted to one project and make several??!)

Thanks for stopping by!
I'm linking up at:


Stinkin Cute Thursday Button