Showing posts with label sewing. Show all posts

Friday, February 10, 2012

{DIY 18" Doll Sleeping Bag}

So now that we have TWO American Girl dolls, they will be having sleepovers. :) We have one beautiful handmade doll bed that you can see a little bit of here.  My father-in-law creates beautiful wooden furniture, so we are fortunate to have a bed, table and chairs, and school desk for FREE. (That's the only way we would have those things, believe me. Yikes on the prices!) So, it's actually wide enough that both dolls can sleep side-by-side, but when they are camping out they really need a sleeping bag. ;)
Again, price the "real" thing and.....it ain't happenin'. My OWN sleeping bag cost only a little more than that. So I grabbed some purple fleece from the clearance remnant rack at Joann's and got started.
I measured it just by laying the doll down and guessing. I think it turned out pretty well. I sewed together 2 pieces of purple for both the front and back side, sliding a thin piece of cotton batting between each of the two pieces. This makes it feel more like a sleeping bag, and it's SO SOFT I want to sleep in it! This doll is camping in luxury!
I sewed scrap ribbon inside of the top piece to use as the roll-up tie. I also sewed velcro along the side, but not the full length of the sleeping bag.
I made a little pillow that you can tuck inside before you roll it up. I kind-of wish I had just made the back piece longer, but it's fine this way, too. Live and learn!
I used scrap felt to make the butterfly on the front, and stitched a swirl design freehand to look like the butterfly 'flutter'. It's hard to see that part in this picture.
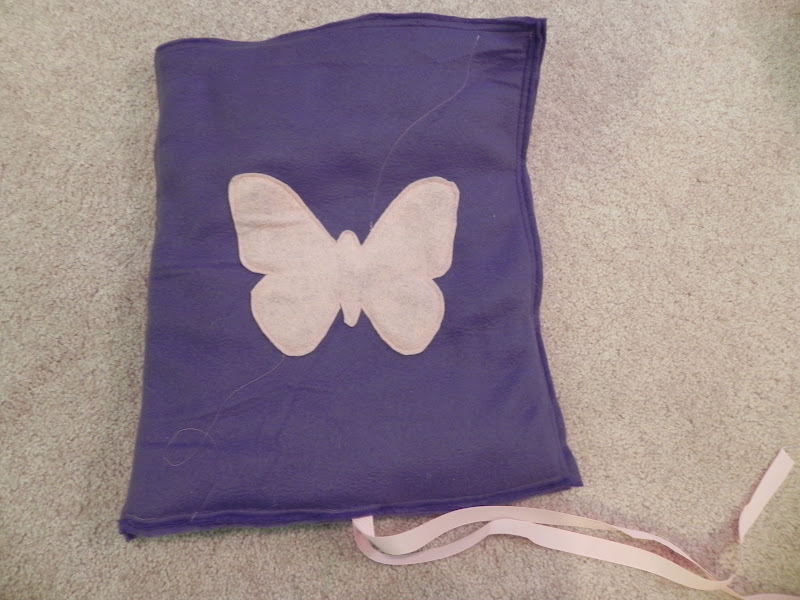
It rolls up nicely and tucks away so it doesn't take up space (and it's easy for her to carry of course).
This cost me about $6 total. The purple remnant I bought was MUCH more than I needed, but it was cheap and I figured I would use it for another project later on. The 'real thing' is in the $30's, without S&H, so I'm counting it as a score.
And look....she must like it because she's sleeping so peacefully!
I have so much fun making things for my kiddo to play with, and even more so when it's soooo much cheaper than buying the same thing! I'm rewarded with gratefulness from a sweet girl, and that's really the best part.
Email me if you have any questions about it!
Thanks for stopping by,

Wednesday, December 21, 2011

{Scrappy Christmas Coasters}

I will be honest and tell you that I made these a couple of months ago, and I'm pretty sure I was surrounded by pumpkins and skeletons at the time. You can never be too early, no? I guess I was on a roll.

I had leftover holiday fabric from an apron I made for my mom like this one. I wanted to make some scrappy coasters with it, so I looked around the internet for some info. I did find several tutorials, and even tried a couple that seemed easy, but honestly they all still seemed too hard. Like I was re-inventing the wheel.
I will apologize ahead of time for the lack of process pictures, but I decided to cut a square template out of old file folders that measured 5.5" x 5.5" (the unfinished size I wanted the coasters to be). Then I started cutting scraps...piecing them to other scraps...and machine stitching them to each other.
Yeah...it was a hodge podge, which was exactly what I wanted.
My only 'rule' to follow was that I made sure that each scrappy piece I finished was LARGER than my 5.5" x 5.5" template. Here are all of my top pieces:

 I then laid the template on top of the scrappy piece and cut it down to size.
I cut a backing piece out of solid fabric to 5.5" x 5.5".
 I adhered a piece of fusible fleece to each side (one to the scrappy side and one to the solid side). I wanted them to be thicker since they are coasters.

I then pinned them wrong sides together, stitched on 3 sides, turned back around, and top stitched all around the edges. I also "stitched in the ditch" along the seams of all the scraps...just to make them look "scrappier".

And the final product...

I'm really pleased with how they turned out, and I love it when I use up scraps.

What have you been up to?
Take care,


Friday, November 18, 2011

{Pieces & Parts Drawstring Bag}

Whew! We are back from our amazing, wonderful, self-indulgent, downright FUN vacation to San Francisco. I'm finally winding down from the chaos that vacation brings, both before and after the trip, and I've been home for 5 days. Vacations will do that to you, no? When I think that this time last week I was in a state of bliss from the incredible day I spent driving the coast with my Honey, I want to go right back and forget about reality. But alas...reality is always here, even if we forget about it for a while. While I absolutely love my life, my home, and my city, there's just nothing like traveling.  I love this photo, because it captures exactly how I felt that day, and how much we both enjoyed our trip. Can't wait to go back!
Just a taste of the awesomeness (is that a word?) of Highway 1.

Now on to my project for today! (If you can focus your thoughts away from the crashing waves, the cool rock formations, the sea air, and the peace that comes from all of that.)
I was cleaning out my small linen closet a month or so ago. This is also where I store my vacuum cleaner, and I realized that when we moved in over a year ago, I actually took all of my vacuum attachments, stuck them in a plastic bag, and hung them on a nail in the closet. Yes...it looks very cool and is super-organized, as you might have guessed. (Wrong.) But that's what you do when you move in and things like vacuum attachments that you NEVER use need a home.
So in that cleaning moment, I decided to whip up a simple drawstring bag so they could STILL hang in that closet, only looking just a little bit better AND I would know what was actually INSIDE the bag once every 2 years when I have occasion to look for those things.
I came up with this drawstring bag:
I used scraps leftover from the Stick Ponies I made for my kiddo's birthday party this summer. I also used scrap ribbon for the drawstring. Now..I wanted it labeled somehow, but since I don't have the super cool Silhouetter or some other e-cutter, I improvised. I used a scrap piece of vinyl that I had left over from my Trick or Treat Photo Hanger . I cut it to the size I wanted, then printed out a label on white cardstock.
I pinned it down, and machine-stitched around it. Voila! Who says I need a Silhouetter? (Okay, I'm just trying to make myself feel better, but bear with me!)

Now my attachments have a home...a LABELED home...and they can live in their ne'er used state in happiness.

Don't you love easy, free projects? If I get to sew, I'm happy. How about you?
Thanks for stopping by!

Tuesday, November 15, 2011

{Rag Quilt Teacher Gift Set}

I actually made this several months ago, and now plan to give it to my daughter's teacher for Christmas. I saw the fabric on clearance one afternoon and picked up some without knowing what I would use it for. This is a nice little carry-all bag, and I love the studious owls!
I cut all the squares for both the inside and outside of the bag with my Cuttlebug, using my Stampin' Up Scallop Square Die. I love the rag quilt look that it creates. You can check out some of my other scallop projects by looking under Scallop Square Die in my sidebar.
This is a very soft and squishy bag, but also boxey. I lined the bottom with 2 pieces of cereal box cardboard (adhered together), then made a matching sleeve to go over it. (If Vera Bradley can put cardboard in the base of her bags, so can I - hee, hee.) 

I added the little wallet/pouch much later. It's extremely simple and very handy. I have one myself that I don't use for money, but I keep it in my purse just to house my craft store coupons! (I was tired of fishing them out, and since I'm at the craft store A LOT, it really comes in handy. Can I get an amen?!)
The top just folds down...over your coupons. :)
Then I just recently added this little coffee cozy, after seeing the tutorial over at Skip to my Lou . It was VERY easy to follow, and it used up the remaining small pieces of owl fabric I had left over. I'm not sure my daughter's amazing teacher even drinks coffee, but it's too cute to not add in!
Cute, no? My "button" on the cozy is actually a cloth covered brad. It was the only thing I had lying around that matched! :)
So here's the final set....
We will probably add some scrapbooking supplies to the bag (she loves to scrapbook, just like I do!), and possibly a small gift card in the pouch. I hope she loves it!
If you have any questions, please let me know.
Thanks for stopping by my little corner of the web!

Saturday, November 5, 2011

{Felt Leaf Garland}

I have only a couple of weeks of Fall decor left before my hubby takes over for Christmas! (He doesn't actually take over, but he does decide WHEN the holiday decor goes up because he's nuts about it, LOL!) So after I take down the Candy Corn Bunting , I string this cute and easy Felt Garland along my staircase. It's so simple to make, and adds a nice touch to any area.
{You need}:
felt
marker
leaf pattern(s) to trace
jute twine
thread, scissors, etc.

I cut the leaves out of felt, 2 sides for each leaf, using a pattern I found through Google. (Any leaf pattern will do just fine.) Then I machine sewed them together down the middle, and randomly added 'vein' lines to each one. (There was no rhyme or reason to it...I just went with what I thought looked good...so don't bother with planning out your veins. They probably look better just going willy-nilly anyway!)
After I sewed together all the leaves I needed, then I hand-stitched a long strand of jute twine to the back of each one. I wish I had pics to show you, but I basically estimated about how far apart I wanted my leaves to be in relation to where I knew I would be hanging it. Then I pinned my leaves to the strand of jute twine and took a second look. Once I was happy with the placement, then I put 5-6 stitches in the back of each leaf to secure the twine. I stitched the twine just to the back side of each leaf, so from the front you can't tell how the leaves are attached at all.
That's it! Very, very simple.
Can you disregard the little green man sitting on the stairs?  He must have been in some kind of time out.  :) 
Time for some super cheese...Happy Fall Y'all! (I couldn't resist.)
Take care,

Tuesday, November 1, 2011

{Bigger Bag...the one I actually DID need}

Hope you all had a fun and spooky Halloween! My kiddo was a bit down with a low-grade fever, but we managed just fine and she came home with oodles of goodies that will rot her teeth and her mind.  :) I'm sad to be taking down all of our spooky decor this next week, but I gotta...because hubby (who is National Lampoon's Christmas Vacation crazy about Christmas) will be taking over for the holidays in just a few short weeks.

In the meantime, I wanted to share a second jelly roll bag I made...and this one I actually DO need! Remember my first jelly rolly, and this cute purse I came up with? I really needed a bigger bag for all-day type functions...you know, when you need a little more than will go in a purse (my purse anyway), but not enough for a backpack?
Here's what I came up with, and it was perfect for our trip to the Zoo Boo last weekend. I {love} the colors and patterns in this jelly roll!

I added a snap, as well as pockets on both sides of the interior. I also used heavier weight interface to give it a little more durability.
The pockets on the left are divided, for cell phone and keys. The one on the right is a larger single pocket.
I'm so pleased with how it turned out.
Thanks for dropping in...I love hearing from you!

Thursday, October 20, 2011

{My First Jelly Roll}

Sounds a little strange doesn't it? ;) 
I picked up my first jelly roll on super clearance at Joann's a couple of months ago, and it's been waiting patiently for me until this weekend. I loved the colors (turquoise and greens!) and it was $6.97 plus a coupon. I designed this bag and {love} how it turned out!
Do I need another purse? Of course not, but I tell you I am addicted to making bags! I'm not sure why exactly, but I love making them...whether they are my own design or using a tutorial/pattern. I actually changed my mind halfway through, so it turned out to be a little different shape than the original plan, but I'm happy with it nonetheless. You never know!
I'm calling it my Jelly Roll Bucket Bag, because when I look at it top-down, it really stands up like a bucket.


I added one larger pocket, as well as a snap.
I'm really proud of it! :)
It's all jelly roll strips except the lining and handle. I love the ease of not cutting the exterior panels!
I'm working on making a larger 'everything' kind of bag, because that I actually do need. We had a parade to attend a few weeks ago, as well as a festival the following week, and I realized that I don't have a larger bag that serves the carry-all purpose AND looks cute. I knew the jelly roll would come in handy to fix that problem. :)
Joann has a 20% off total purchase coupon this weekend, so I'm heading to Joann tomorrow to see if I can find some more clearance jelly rolls. I'm on a roll I'll tell you....haha...okay...not so funny. (Can you tell I'm getting tired?)

Thanks for stopping by!

Friday, September 23, 2011

{Candy Corn Bunting}

I {loooooooove} them!
I found a really great tutorial over at Tatertots & Jello for super simple and amazingly cute reversible candy corn bunting .
The tutorial is really easy to follow and in no time, you have this:
Isn't it darling??!  I made my own bias tape instead of using ribbon, and I altered the measurements a bit on the pennant. I made 2 of them and can't wait to start decorating!
I have been making Halloween projects galore and having a blast, like I always do this time of year.
I absolutely love Halloween!
What have you been up to?
Thanks for stopping by,

Tuesday, September 20, 2011

{Coaster Tutorial}

My Mom really needs a tutorial for the Halloween Coasters I made last week, so I thought I would post it here. These are super simple, and a good project for a sewing machine beginner (like my Mom, whose been faking it all these years, as I learned this week!) But that's okay...she's learning! :)
So maybe someone else can benefit from this, too.
These are made with Halloween fabric, but obviously you can use whatever you want.
My pictures are of ONE coaster, but I actually made a set of 5 all together. 
Here you go, Mom!

Halloween Coasters
1. Cut the following for a set of 5 coasters: 
(5) front fabric pieces, 5 1/2" x 5 1/2"
(5) back fabric pieces, 5 1/2" x 5 1/2"
(10) pieces of fusible fleece (2 for each coaster), about 4 3/4" x 4 3/4"each
(as long as they are SMALLER than your fabric all the way around, it really doesn't have to be exact)
This photo shows only enough for ONE coaster.
 2. Iron the fusible fleece to the wrong side of your front fabric and your back fabric. Put the glue side of the fleece to the wrong side of the fabric, then turn it over and iron from the RIGHT side. It will look like this when you're done:
3. Now pin the two pieces of your coaster, RIGHT sides together, on 3 sides.
4. Sew on 3 sides.

5. Turn right side out, pushing out the corners with a pencil. It will look like this:
6. Turn under the open edge, line it up, and pin it together.
7. Topstitch the open end together, then continue all the way around the coaster. You will topstitch in a little way from the edge.
Your finished border of topstitching will look like this:
I like to add another row of topstitching just for interest. If you do that, just use your first topstitch line as your guide and go around again. If you do 2 rows, it will look like this:
 Voila! Mom...you just made a coaster! Now repeat with your remaining pieces to make a whole set.
Hopefully they all turn out like these...
Thanks for stopping by!

Creative Itch