Showing posts with label stamping. Show all posts

Wednesday, August 1, 2012

Co-Worker Gifts....Early!

Hello friends! I'm still here! :)  This has been the fastest summer of my entire existence...I swear. I don't know where it has gone, but school starts in just 3 weeks for my kiddo and 4 weeks for me. I am already feeling sad!! Many mommas are ready for the routine and truth be told, just ready for their kids to go back to school...but not this one! Yes...I need breaks, yes...we get tired of each other throughout the summer..., and yes...our days aren't always perfect. BUT. I still would rather us be home together than anywhere else. Call me weird, but that's hows I sees it! :) 

I have projects in my mind, yet they don't seem to be materializing these days. Maybe it's the heat, or maybe it's just our busy summer schedule, but I'm a little bummed that a few of those haven't come to fruition. But...I did get this little task completed. One that I will thank myself for throughout the school year when I'm crazy busy and don't have the extra time for things I could have prepared over the summer!

Do you remember the little birthday gift exchange we do for the teachers and staff at my preschool? Well, to catch you up, each person contributes some small item(s) around $2-$3 to a birthday bag for each staff member each month. This might sound cheapy to some, but it's right up my alley! You would be surprised how many cute little things you get in your birthday bag, and always things you wouldn't have picked up for yourself. I loved opening my birthday bag last year. We have a monthly birthday lunch to celebrate, and open the bags during that time. Last year I made Notecard Gift Sets and  Lovely Chipboard Bookmarks, and they were so well-received. I made those throughout the year though, and also picked up things along the way (store bought). For this year, I'm trying to get ahead of the game!
I picked up several sets of pens and hardback mini-journals from the $1 Spot at Target, and tied them up with a scrap ribbon.
Then I spotted some super cute decorative pens with coordinating kleenex packets and compact mirrors at Michaels. Score! I picked up several to make little sets of two. I used one of my handy pretty punches to make the tags, stamped a sentiment, and distressed the edges a bit. Let me just say: If you do not have a die cut machine, e-cutter, or something similar, don't fret! Picking up a couple of tag-like punches can REALLY make your life easier for little gifts for friends, co-workers, and teachers.
These happen to be from Stampin' Up, but you can find cute stamps on the $1 rack almost anywhere, and punches for $10-$12.
I tied them up with colored raffia that I was obligated to buy from a school fundraiser last year. I hate those things, but it actually came in handy this time!

So cute!

They all fit into my bliss of cute, cheap, and easy...so it's good!
I swear...how did we live without the $1 Spot??
Have a good one,

Friday, January 20, 2012

{Note Card Gift Sets}

I promised to share more little packages of paper goodness and so I shall.
Another item I've stockpiled for staff birthday gifts are these sets of (4) blank cards/envelopes:
I made several sets with simple color combos, each one consisting of (2) stamped 'Thank You' cards and (2) stamped 'Thinking of You' cards. The inside of each card is blank so they are flexible and easy to write a quick note. 
I topped the cardstock base with an embossed layer, which is a really simple way to add an elegant touch and easy texture to any card. I use Cuttlebug embossing folders, but there are lots of options.  I punched the sentiment and scallop circle, and tied jute around the layer. Notice how I used a basic card sketch and just changed the color combinations? It's a really simple layout, but still lovely and great for mass producing. Anytime you can incorporate one element of the card using a punch or die, you go into major time-saving mode.
I added 4 envelopes to each group and packaged them in cello bags with jute ties. Teachers always need a 'Thank You' note at the ready, and 'Thinking of You' applies to everything from a friendly note to a sincere message to a friend in need. I'll be dropping these in the birthday bags next month and I hope they are well received. Each bag is filled with a little love!

Happy Creating!

Thursday, December 15, 2011

{Christmas Cards for a Cause}

Hello to all, and here's to hoping you're not quite as busy as we have been around here!
As always, the season is flying by, although I feel lighter and not quite as stressed as years past. It's pleasantly surprising and a nice feeling, I have to say. I don't really think I'm doing anything to de-stress, I just went into the holiday season with a better state of mind. I decided I was going to focus on our family, and not all the marketing, materialism, and overspending that I see everywhere. It must be working, and for that I'm thankful!
 Remember the Snowman Soup I made? Well I had some wonderfully usable scraps leftover, along with several stamped images that I didn't need, so I decided to whip up some cards. I used my Cuttlebug embossing folders for the white background, and textured cardstock for the base. (Same as my Snowman Soup labels.)

Each card measures 5.5" x 4", and the base was actually already cut naturally from the Snowman Soup labels. All I really needed to do was add some layering for the sentiment, so they whipped up pretty quickly. Each one will fit in a standard A2 envelope.
Outside of one that I will include with a gift for a friend, I decided that we'll use these to spread some cheer to a recovering soldier at the Bethesda Naval Medical Center. A friend of mine who is a former Marine sent me the address to use, and it seems like there's no way better way than to send something handmade to someone whose sacrifices are beyond my comprehension.
I am using the following address and greeting, for the envelopes. Address it to:
A Recovering American Soldier
c/o Bethesda National Naval Medical Center
8901 Wisconsin Ave.
Bethesda, MD 20889-0001

Hopefully they will be a blessing to those who have sacrificed for our freedom!
Have a great week,

Sunday, December 4, 2011

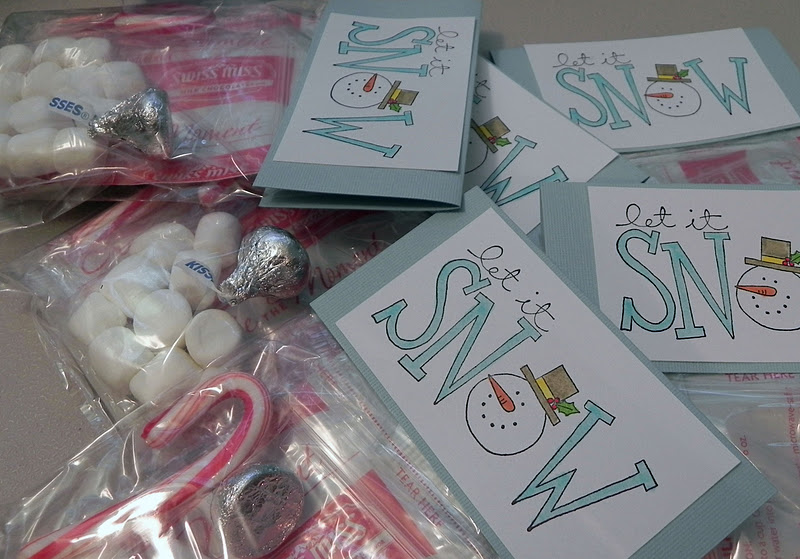
{Snowman Soup}


There are so many cute versions of Snowman Soup out there! I've only made a few in the past, but this year I decided to put one in the mailbox of each of my fellow teachers at the preschool. I absolutely loooooove mass producing! I got my original idea from Chic 'n Scratch , and then altered it a bit with the size of my bag and dimensions for the cardstock. I had this stamp set that I rarely use but comes in handy every once in a while.
Really...use whatever size bag you have or can find, and then cut your cardstock accordingly. The supplies are inexpensive, and make really cute little holiday gifts to stash in a stocking, on top of a gift, or {in a school mailbox}.
You need: hot chocolate packets, mini candy canes, Hershey kisses, and mini marshmallows. I stamped 20 images and colored them in. Then I cut all the coordinating cardstock and the saying, so everything was ready to assemble in a production line. :) I like working that way! Remember to staple your bags shut BEFORE adhering your sentiment/cardstock.
Here's the saying I used. I printed it from Chic 'n Scratch , but there are several versions out that, or you can make up your own.

I so enjoyed making these! I have wonderful scraps, too, that I used for good. :) I'll be posting those soon!
I can't wait to pass these out next week! Makes me smile!

Take care,


Sunday, October 16, 2011

{Freebie Halloween "Tree"}

Have you seen those really cute gnarled, scary-looking tabletop trees? You know, the ones you add little Halloween ornaments to? I almost bought one of those, and then remembered that I have 24 trees in my yard. :)
So we grabbed some branches on a nature walk, stamped some spooky images, and adhered them to scraps from my Halloween Countdown Calendar. I added some candy corn for color, and because hey...you know I love candy corn. 
Why is it that there's something I just love about dead branches in a vase in my home?
 I used a jack-o-lantern face stamp for this one, and punched out the oval to make my own ghost. Can you tell this took 5 minutes?


My vase is $1 Store of course. Love it...I think we will do these every year from now on!
Happy Haunting!

Making

Wednesday, February 2, 2011

{Framed Burlap}

I'm a huge fan of signs...mostly antique ones...displayed in my home. When I saw this project at one of my favorite blogs, Brown Paper Packages , I had to try one for myself.
I changed it up a bit to make it something I could leave out all the time. So now I have a super cute "Est. 1998" sign on my antique hutch in the kitchen! It must be pretty cute because even hubby commented how much he liked having it there!  :)  I used a square frame that I  no longer have a photo for, re-painting it black and distressing it again.
I used Staz-On black ink, and a set of my el-cheapo foam alphabet stamps from Hobby Lobby. LOVE those things at 50% off. I use them for everything and they work just as well as pricey wood mounted.
After cutting my burlap the right size, I got a general idea of letter/number placement mostly just by lining up the stamps and eyeballing it. It didn't take long at all, and I think it's a great rustic look.
Check out Kierste's project here!

Take care,
Deanna

I'm linking up @: