Showing posts with label kid stuff. Show all posts

Wednesday, February 1, 2012

{DIY American Girl Tutu}

Have you priced ballet sets for American Girl? Yikes! We have tons of clothes for our American Girl dolls, and only a few are 'original' AG purchases. The rest are homemade, or purchased from other handmade sellers who are more proficient than I. :) I do like to get free patterns from Liberty Jane, and we've made 4-5 pieces using them. I am not so great at sewing clothes, however, so I look for other sources pretty frequently. We have a favorite Ebay store that I highly recommend for American Girl doll clothes. Email me if you would like the info and I'm happy to share!
Sp in lieu of a purchased ballet set, and since her lessons are, in fact, FREE...we improvised and made our own ballet tutu.
Today's project is what I like to call "on-the-fly"...meaning I had a random thought to make it, then sat down and fifteen minutes later it was done. Not a lot of thought, which can sometimes be the projects that are the most fun.

SUPER easy to make for the 18" doll in your life.
Here's what you need:
scrap tulle
ponytail band,in pink or a neutral color
scissors

I started by measuring the doll from the waist down to where I wanted the tutu to fall on her legs. My tulle strips were cut (and not precisely) to about 5" long. I had lots leftover from my Fancy Bird Nest, so I just started cutting on that. It takes lots of strips, so just keep cutting. :) 
After you cut your strips, you are basically just going to start tying knots on the ponytail band, all the way around. I thought it was easiest to tie the knots on while the ponytail band was actually around the doll's waist. Slide a strip through...
...and tie it in a tight knot.
Slide each knot very close to each other, and the tutu will be fuller. 
Just keep doing this all the way around, knotting, tightening, and sliding the knots close together. It's that simple!
I left lots of extra at the top of the tutu to start with, so that I could cut it to size and not worry about mistakes. Once I got 4-5 strips knotted, I went back and trimmed the top pieces sticking up to about where I wanted them to stick up above the waist.
See how much extra I gave myself? Once you have it all trimmed, it looks like this:
So easy, and you now have a tutu for cheap! :)
We could have purchased the whole ballet outfit for $40-$50, and I know it would have been lovely and quality. (I've been happy with ALL of our American Girl purchases.) BUT...my kiddo doesn't play ballet with her dolls every day, and for that price, I would want her to. It doesn't seem right to MAKE her play ballet everyday (wink), so we went with a modified ballet outfit for only a dollar or two and I don't care what she does with it. (Last time I saw this it was stuffed in a dresser drawer.)  :) That's the beauty of kid-projects on-the-cheap, no?
Make one of these for the doll in your life...or show your daughters how and enjoy a project together. Afterward you can meet up at the 'studio' for a lesson and some ice cream afterward. :)
Have a great day,

Friday, January 27, 2012

{100th Day of School: T-Shirt Project}

The 100th Day of School!
One of my favorite days of the year as a teacher!
So much fun all day long, and ALL of it is learning!
My preschool class is just a 3-day/week class, so sadly we won't make it to 100 days this year.
As a result, I have to live vicariously through my sweet daughter, who will celebrate her 100th Day of First Grade today!
She really wanted to WEAR 100 things, so here's what we came up with.
We picked up a t-shirt at Hobby Lobby, along with a pack of safety pins.
I printed onto coardstock large numerals '1' and '0' from Word and cut them out.
I pulled out a strip of scrap denim from an old pair of jeans, and my Wonder Under. (Keeping old jeans is a lifesaver in the craft room! Never buy denim off the bolt again!)
I traced and ironed the numerals with the Wonder Under, and adhered them to the shirt. 
Then she counted out 100 safety pins and I stuck them on.
She LOVES how it turned out, which is my favorite part!
She can't wait to wear it tomorrow and I can't wait to take pics for my scrapbook. :)
What are your kids doing for the 100th Day of School?
Take lots of pics and have fun with it!
Take care,
I'm linking up to these parties:


For the Kids Friday 


Thursday, January 12, 2012

{'All About Me' Booklets for Dolls}

Santa added a second American Girl doll to our home this year and the fun hasn't stopped. Dare I say that Mom likes all this doll stuff as much as the kiddo does? I hate to admit it, but I get a little pulled in to the tiny realism! My kiddo was wishing out loud for little booklets for each doll to write down their favorite things. Alas, she was writing on PLAIN scrap paper that had no flair at all. What???! So I went to my own scraps (the scraps with flair) and came up with these.
I made these exactly like my Scrappy Quote Chipboard Book , I just changed the size. Again, I used cereal boxes as my chipboard, and adhered scrapbook paper to both sides of that to make the front and back covers.
I created the pages in Word, and printed them on white cardstock.
One likes horses and one is from Hawaii. :)
 I punched the holes with my Crop-a-Dile and bound the books with hemp cord.
These are 5x7 for the overall measurements and my kiddo {loves} them! She wants me to make one for her, but since she's a living, breathing-not-plastic-and-stuffing person, I think she should have the store bought version. :)
If you'd like to make some of these for the 18" dolls in your life, you can download the pages I made here:
I also added one blank page at the end just for drawing or miscellaneous.
Have fun playing!
I'm linking up to these parties:


Sunday, January 8, 2012

{DIY Lunchbox Notes}

School started on Wednesday (back to the old grind for all of us!) and as I was thinking about lunches for the week, I realized that my little basket of lunchbox notes was finally about empty. Time to restock! I have several versions of lunchbox notes saved on my computer...really cute, very easy to print and cut out, very convenient. Then I remembered that I'm low on printer ink. Ugh...don't want to a)go out and get more at this point or b)spend more $$ on it unless I have to. I have to print lots and lots, but lunchbox notes is NOT one of them! :)
So I stepped into my craft room and said to myself...."Woman, you have LOADS of unused paper lying around...masses of stamps and stickers...WHY do you need printer ink?"
Now of course I can write a quick note on scrap paper, and without a doubt, the love is still there. Some of my favorite love notes from my sweet husband have been on a napkin. You've got those, right? BUT...since I'm a crafty lady and my daughter likes cute stuff...I had to go a little further, while still keeping in mind that the reality is that these will get PB&J on them and will go in the trash. (Meaning, I'm not making little masterpieces either!)

You know all that 12x12 white paper that they stick in scrapbook sleeves?
Do you keep yours? I always just stick it in this organizer. My kiddo uses it for art projects at times, and I use it for stamping scraps as well. It's perfectly good white paper and I have tons of it.
So I grabbed a few sheets of it, a couple of journaling stamps, ink, and a stamp set I have from Stampin' Up with cute sayings and little critters.
I started stamping, trying to space them on the page to allow for cutting out and leaving a small blank side for my handwritten note.
Then I cut them out and added them to my little note basket that is hidden in the kitchen cabinet. She knows I write them, she just doesn't know where I keep them. :)
It's a little silly, but it's gratifying to create with scrap paper, whatever craft medium you can scrounge up, and save money at the same time. Will I still need to buy printer ink? Yep! But I'll only be using it to print what I really NEED to print. And...handmade lunchbox notes is just a {little} extra love, isn't it?
Have a good week!

I'm linking up over at these fun parties:

Thursday, December 8, 2011

{A Fancy 'Bird's Nest'}

My kiddo started collecting Audobon stuffed birds last year, adding one more thing to hoard group of things to keep organized or displayed. They ARE pretty cool....they look like the real bird, have an info tag attached with all kinds of details about it, and when you squeeze them they make the real sound of that bird. So....when you have several, it's pretty interesting to compare their looks and sounds.
Until now, they have been kind of dumped in with other stuffed animals, just for a lack of having a place to display them well. She doesn't really play with them, but would like to have them on display somewhere.
I purchased a stuffed animal net from Amazon a few months ago, thinking this would be the perfect way to display the birds...out of the way...in a corner of her room. After searching everywhere for a net, the one I bought was actually 6 feet (!) in length, and even when I doubled it was waaaaaaaayy too big. It's now stuffed in a cabinet in the garage. :( The whole plan got put aside for a while until Thanksgiving break when I was telling my in-laws about it. I'm not sure why I never thought of this, but why not make my own 'net'?? DUH? How did this little shard of brilliance never enter my mind before this?
So today, this little display problem is finally solved, and I'm so happy with the results. I'm even happier that it was CHEAP. It is Christmas folks and the cash flow is on the down low, if you know what I'm sayin'!
Whatcha think?
This thing is actually fairly heavy, with 10-11 birds in it, so I think it would work great for any small stuffed animals in any little girl's room! Here's how you can make one!

YOU NEED:
2 yards of tulle (<$2/yard)
3M wire hooks
ribbon
rubber bands
scissors


I didn't take pics of each step because honestly, it's pretty simple. I just pinched each end in my fist, about the distance I thought would work for the 'net' in the middle. I wrapped a rubber band around each end where I had pinched it, to keep it in place and hold my 'net' boundary. I did NOT cut anything off the ends until I was all finished and had it hanging up, that way I could determine exactly how wide I needed it to be and wouldn't waste the tulle. I recommend doing the same!
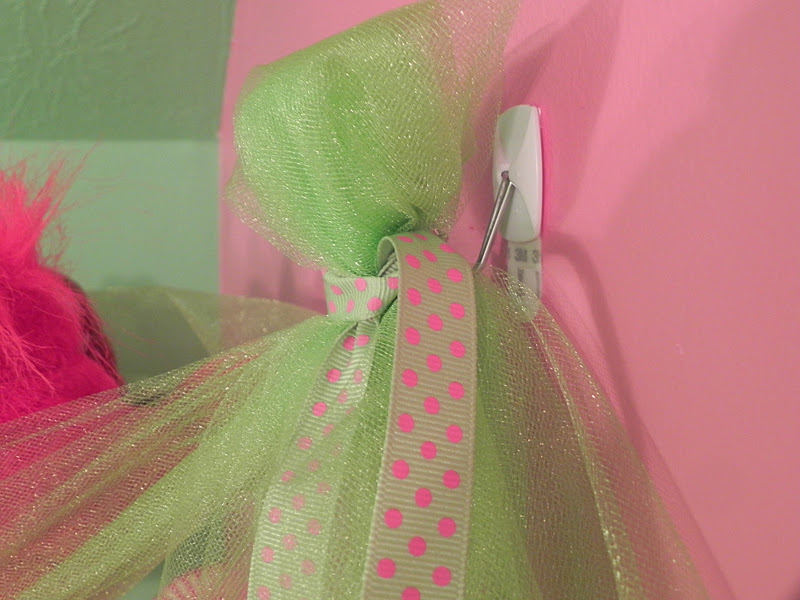
Once you tie 'net' boundary on either side with a rubber band, take your ribbon and really tie it to your satisfaction. I tried a bow (which I'm no good at it and I'm convinced you need a degree in to make them perfectly), but that didn't go well. I ended up knotting my ribbon on either end, with longer strands hanging down. But go for it and by all means, if you're one of the lucky ones with a PhD in tying bows, have at it!!
Here's how I ended up hanging it on my 3M hooks. I just slipped my knotted ribbon over the hook.
Does that make sense? See how I gathered some of the tulle at the top of the rubber band, and didn't pull it all the way through? Once you have it hanging up, take your scissors and trim off the extra on one side (if you need to). My corner really wasn't too wide, so I had to trim off about 6" trailing from one side. Yours could be less or more, depending on where you decide to hang it.
That's all! Isn't that simple? I seriously don't know why in the world this didn't come to me before.
{Love} easy and cheap, don't you? (Not to mention that those birds are OFF the floor now!)
Let me know if you have any questions!

Thanks for stopping by!
Link Party


Sunday, November 27, 2011

{Laughs for Christmas}

We made up this little joke jar last year, and anxiously pulled it out last weekend for another year of Christmas laughs. Just a quick little joke out of the jar every day puts a smile on your face!

Here's what you need to make yours!

Plastic container from your recycle bin (this is a parmesan jar)
cardstock
jokes!
 I got my jokes from Holiday Jokes @ Teach Mama and also through a Yahoo search.

Clean out your container, type up or print your jokes, then cut them out and fold up.
Have your cute kiddo(s) make a title for your jar. Ours is called "Christmas Funnies". I just added a belly band of red cardstock for the base, and added her title to the front.
There you go...a little holiday joke jar to spread a smile every day!
 When I come across a new joke, I just jot it on a scrap piece of paper and add it to the mix. Keep the  collection growing! And hey...if you re-use a parmesan jar, it already looks festive. :)

Have a wonderful week!
Tip Junkie handmade projects

Saturday, September 17, 2011

{Little Girl Crossover Purse}

My daughter has masses of dress-up purses (my old ones), and lots of Princess and misc bags to play with. We actually could purge a few! But as she played the other day, I realized that when we go shopping with her money or gift cards, for some reason I'm still in charge of the currency. Not really intentionally, just out of habit.
At 7, it's about time she kept up with it a bit!

Enter: Mom...with a "little girl purse" idea.
I started measuring her. I knew I wanted it to go across the body so it didn't get lost in the excitement of Barnes & Noble or Build-a-Bear. (Anyone else have daughters?)
Here's what I came out with, using old jeans from my stash and misc scraps.
I had a 'first', and didn't put the straps inside the lining. Instead I finished the ends and sewed them in an "X" to each side, then added a button for looks.
Here's the skinny if you want to make your own!

Lining (2): 7 1/2" x 8"
Exterior (2): 7 1/2" x 8"
Straps: I cut her strap fabric to 2 1/2" by about 37", but measure your own kiddo for accuracy
Fusible fleece for the strap
Buttons, embellishments, Wonder Under, misc.

The body is made from jean pant legs, the straps are literally made of scraps, and the flower on the front I die-cut with my Cuttlebug and ironed on with Wonder Under. I think I boxed the corners at 1".

 My fave part is the strap. I've never made anything "scrappy" with fabric (not sure why), and I love how it turned out.
Perfect size for her cash, gifts cards, chapstick, and sunglasses!

Have a nice day!

Wednesday, August 24, 2011

{Play Money: The Way to Learn}

My 7 year old has had old scraps of handwritten makeshift play money for a long time, and although it works, it could be better. When she's playing store, or paying her vet bill, or shopping at the pet store, she really should be counting out something close to real money. You know...playing and learning. It's how we roll around here, so I can't believe I haven't made these earlier. I think I printed out some generic bills a few years ago on green cardstock, but let's just say....uck. Not the ideal.

So I did some searching and found these wonderful printables at Money Instructor. You can download $1's, $5's, $10's, and $20's. They look very real, but are smaller in size than the real thing.
$50 Bills-Play Money
 I printed several copies of each on white cardstock and cut them out.
(I use Georgia-Pacific cardstock from Wal-mart for general projects.)
Then I sealed them up with clear laminate (from a roll) for durability, and cut them out again. Rolling over the laminate with a brayer (or rolling pin) really helps get the bubbles out quickly.
 They are durable and very authentic...perfect for learning while playing.
  Wouldn't it be nice if these were real?
Have fun pretend shopping (and counting) with your kiddos!

Take care,
Linking up at: