Tuesday, June 12, 2012

Skirt to a Bag...Handmade Birthday

Our summer is kicking off with birthdays GALORE! So many parties and gifts to buy, including those for my own birthday girl at the end of the month. Whew! Lots of fun, but keeping up with gifts can be costly and stressful at times. I would like for a gift to be fun and useful, but it's hard to know what children want that they don't already have. 
Since all of our parties are for little girls about age 8, I often make purses and bags out of old jeans.  I am now getting a few requests from parents that are familiar with them. Apparently they are used and loved by the kiddos, and that's the best reward for those of us that love to create!
You can see a few of my previous upcycled denim creations here:
Fun, right? So simple to make, and you get to upcycle old jeans at the same time!
  For an upcoming birthday, my daughter requested that I make a bag for her special friend.
 I found an outgrown denim skirt (kid sized) in my stash and and immediately pictured a crossover, larger bag...almost like a messenger bag.
Can you picture this skirt before I embellished it? In my excitement, I forgot to take a 'before' pic. :)
 It was super simple to make!
First I sewed the bottom of the skirt closed using a  matching thread. This didn't need to be cut off like a pair of shorts/jeans. I thought the original hem and little slits on the side looked more authentic, so I just stitched straight across to close up the bottom of the skirt.
I went through my fabric and came up with 2 coordinating patterns for the strap and cut them to 46". This is long for my daughter(who is of average height), but the recipient of the bag is EXTREMELY tall :), so we decided to add some length. (The 46" includes seam allowances.)  I adhered some fusible fleece between the two fabrics to make the strap more durable and a little padded.
I sewed the straps on opposite sides of the skirt waist, then added the flowers to embellish it a bit.
I found a "K" brad in my scrapbook stash, so the bag got a little personalized tweak at the last 
minute!
 This is a great size for a few books or art supplies, or just to carry miscellaneous on-the-go.
What do you think?
Never throw away old jeans and denim skirts. You never know what they can transform into!
Thanks for dropping in,


Friday, June 1, 2012

Pet Loss Project

Hello friends! It has been too long between posts, and I hope to change that now that school is out and things are settling down a bit. We are working on planning a Rainbow themed 8th birthday party for the end of June, so I hope to share some of our planning and the final details with you as we go along. I'm loving all the cute ideas I'm finding for the Rainbow theme, and anxious to see it all put together!

On a sad note, my post today is motivated by our family's recent loss of our beloved dog, Riff.
Riff.......RIP 4.23.12
 Riffer was our fur baby before our human baby came along. He went with us almost everywhere, and really was another child in our house. His death was unexpected after a fall on our stairs, but he lived a long and wonderful life and brought us so much joy and laughter. He was 2 months shy of his 15th birthday, and we feel so blessed to have had him with us for so long and in overall good health.

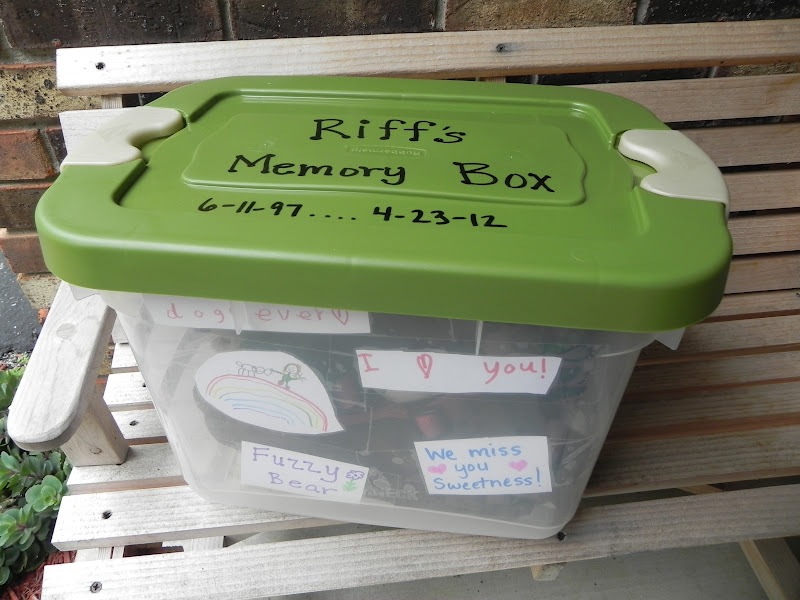
So now that I've put the sad part out there, my project today lends itself to celebrating a pet's life after the loss. I hope that our little project might help someone else out there who is dealing with the loss of a pet. In losing Riff, my dear daughter lost a true best friend and playmate. As a way to help bring closure to our unexpected loss, we created a "Memory Box" last weekend.
 This is so inexpensive but so completely filled with love that it really gave us a half an hour of laughter, tears, and memories remembering our boy. 
I purchased a smaller-sized Rubbermaid tote (sorry that I ripped off the label and don't know the actual gallon size!) and we got busy with markers, scissors, and colored pencils. We planned to fill our box with Riff's puppy toys, his "blankie", harness, ID tags from our homes, sympathy cards, etc. All of our "Riff Keepsakes". My girl got busy writing phrases, messages, and drawing a picture or two to decorate the box.

 Isn't it sweet? We tried to use some of his many nicknames.
I adhered each piece to the INSIDE of the box with clear packing tape, which just seemed easier than using contact paper. We really wanted the focus to be on remembering and decorating, and not on the application. The packing tape worked perfectly.
This is a picture of my daughter and Riff on the Rainbow Bridge.
 I used permanent marker to title the top of the box, and then we filled it up. The whole family feels really pleased with how it turned out. Nothing fancy, but filled with love.
 
Thanks for stopping by and if you have a cherished pet, give it some extra love today. 

"Dogs are not our whole life, but they make our lives whole."
-Roger Caras

Take care,


Monday, April 2, 2012

{Paper Organization on the Cheap}

I saw this WONDERFUL idea on Pinterest a few weeks ago and knew that it had to somehow work for me!
It was just listed on a forum at the link above, so that's the best credit I can give.
Isn't this an uber-terrific idea??!

My first thought was scrap and art paper storage for my kiddo in our office area, but it just doesn't fit into my built-ins very well. However, my preschool classroom is low on counter space, and I find myself stacking materials and getting cluttered.
I made my own, and turned it into a "Monday-Wednesday-Friday" file cabinet for my classroom.
Now I can sort prepped materials, and the best part is......FREE!!! :)
I used spray paint and scrapbook paper that I had on hand.
I started by cutting one end off of each box, then using duck tape to secure them together. I figured that paint would stick better to duck tape than packing tape. Next I sprayed them with white primer.

I then actually sprayed it with red, but it just didn't cover as well as I would have liked. I decided to go with a basic black instead, since I knew I would be embellishing it a little with scrapbook papers.
I did 2 coats of black, and if you really look, you can still see some of the original markings on the box, but it's minor. I cut scrapbook paper and printed the days on cardstock, and adhered it to one side with sticky strip. I die cut the stars as an extra.
This will really help to keep my prepped materials organized and looking better, and I didn't have to spend any moolah.
What else can you come up using these freebie boxes?

Have a good one,
 

Tuesday, March 27, 2012

{Plastic to Pretty}

Hello to you! Sorry I've been MIA lately!  Life around here seems to be flying by, and I sure have missed the chance as of late to get creative. I haven't been able to post much, or even scour the craft world for all the wonderful ideas out there. I've found that lately I've been putting all of my creative energies into my Pre-K class, although I have a long to-do list of things I'd like to work on around the house. Spring 'sprung' up early 'round these parts, so I've been enjoying watching everything bloom and getting back on the mower. (One of my favorite parts of taking care of our large lot.) I haven't been able to spend as much time in there as I'd like to, but check out the view from my craft room:
Isn't that tulip tree gorgeous?? It's a wonderful inspiration (as long as you're actually IN that room, ha!)
So...here's a simple little project I whipped up recently. We have tons of little plastic baskets around our house. You know, the little white ones that come 2-3 in a pack at Walmart for a buck or two? They come in all shapes and sizes.
My daughter has a few around her bedroom, just to keep the little things organized and together. Her headboard has shelves on it, so she keeps a small one there with her nighttime 'necessities': chapstick, a pen, cortisone cream, and of course, a Fairy lipgloss. ;)  She uses another for her collection of bookmarks, and so on. I decided they needed a little bit of embellishment!
I chose some ribbon from my stash that matches her room  and just started weaving.
What a super easy way to make a tiny change and embellish a plain little basket!
I didn't cut a length of ribbon to start. I just started weaving, and then trimmed it at the end. On the first basket, I overlapped it where the two ends met and they naturally lay flat. You could add a touch of glue or sticky strip if you need to hold the ends down.

Cuter, no? And it actually 'hides' the boring contents a bit as well.
For the longer basket, I decided to tie the ends together in a little knot at a corner. I really like how that looks. Now I can picture favor baskets for birthday parties, little gift baskets for teachers and neighbors, and more.

An easy way to spruce up a very plain (but necessary!) item.
Thanks for stopping by, and for your patience. I've missed posting, and am looking forward to getting back in the swing of things!
Take care,

Thursday, March 1, 2012

{Paper Bag Scrapbook}

Whew!! I've been MIA lately and I'm not quite sure where the time has gone. I haven't been able to spend as much time in my craft room lately as I would like, but I did manage to get a little 'fix' with these little paper sack scrapbooks. These are so simple, you need VERY few supplies, and they make cute little keepsakes! I've seen lots of them, but never made one myself until one of my days off this week. There may be better ways to make one than mine, but I like the way it turned out.
I wanted  a cutie little place to keep a few of the group pictures from my preschool class this year. I didn't want to buy a photo album, because I really don't have enough pics to fill one. I saw my giant pile of brown paper lunch sacks and thought it was about time to try one of these!

I cut my bags off just above the bottom flap, then put a little glue stick on the open end to keep it together. From there I just added the pictures I wanted, and embellished with scrap pieces of patterned paper. I added a little bit of text here and there, but not a lot. I made it REALLY quick, but I can see doing one in more detail. Cute potential all over the place!

I punched the holes with my Crop-a-Dile, added book rings, and decorated with scrap ribbon. Voila! I think this would be a fun project for kids to make their own little scrapbooks on the cheap. I'm going to suggest them to my daughter's Daisy Troop Leader and I think the girls will love making them. They can make great little keepsakes with cheap scraps and stickers.


Thanks for dropping by!


Thursday, February 16, 2012

{Rainy Day Craft Box for Kids}

I'm fortunate to have a craft room with more than enough space in it for me (it doubles as a spare room, which is rarely used for company). It hasn't always been that way, but the last 3-4 years I've had that luxury and I love it! One thing that I still feel could be better organized though are the craft items for my daughter. Supplies, materials, and items that I wouldn't use for my own crafting but are better suited for hers.
When she was little, I had very little space for that type of thing. I don't have a photo, but I used a door shoe organizer. It was perfect to keep things handy for her, and no one knew about it. ;) Once I got a room of my own, I sorted her craft items into small totes that would fit onto my shelves. I labeled each of them, because they are filled with miscellaneous supplies. 
We go to them when needed, and otherwise they are neatly stored out of the way.
Lately though I realized that things were getting a bit messy in this area.
Apparently this age group (7-8 yr olds) receive little craft kits for every birthday or holiday. It seems to be the norm, and what ends up happening is we stuff them in with our craft supplies and they get forgotten.
 These are just a few of the little kits she has, that we inevitably NEVER get to because they just haven't been very visible or accessible.
We sorted them out, found an unused plastic container, (a file box we already had), and made a label for it.
  The file box actually works really well because it fits nicely on a shelf in her closet. On those days when she isn't sure what to do next, she can easily SEE it now and has the choice to pick one of her craft kits to fill her time.
Super simple way to keep these kits at the ready. (And hopefully get them finished!)
Anything to keep kid stuff organized and easier for them to get to independently is always a good thing!
Take care,