Sunday, December 25, 2011

{Merry, Merry Christmas!!}

Here's wishing you the Merriest Christmas ever and a New Year full of blessings and more blessings!
God is good.

(About to board the Polar Express.)

Looking forward to great things for my family and creative projects in my craft room in 2012!
God Bless,


Wednesday, December 21, 2011

{Scrappy Christmas Coasters}

I will be honest and tell you that I made these a couple of months ago, and I'm pretty sure I was surrounded by pumpkins and skeletons at the time. You can never be too early, no? I guess I was on a roll.

I had leftover holiday fabric from an apron I made for my mom like this one. I wanted to make some scrappy coasters with it, so I looked around the internet for some info. I did find several tutorials, and even tried a couple that seemed easy, but honestly they all still seemed too hard. Like I was re-inventing the wheel.
I will apologize ahead of time for the lack of process pictures, but I decided to cut a square template out of old file folders that measured 5.5" x 5.5" (the unfinished size I wanted the coasters to be). Then I started cutting scraps...piecing them to other scraps...and machine stitching them to each other.
Yeah...it was a hodge podge, which was exactly what I wanted.
My only 'rule' to follow was that I made sure that each scrappy piece I finished was LARGER than my 5.5" x 5.5" template. Here are all of my top pieces:

 I then laid the template on top of the scrappy piece and cut it down to size.
I cut a backing piece out of solid fabric to 5.5" x 5.5".
 I adhered a piece of fusible fleece to each side (one to the scrappy side and one to the solid side). I wanted them to be thicker since they are coasters.

I then pinned them wrong sides together, stitched on 3 sides, turned back around, and top stitched all around the edges. I also "stitched in the ditch" along the seams of all the scraps...just to make them look "scrappier".

And the final product...

I'm really pleased with how they turned out, and I love it when I use up scraps.

What have you been up to?
Take care,


Sunday, December 18, 2011

{Quicky Centerpiece}

I've got 2 minutes set aside to blog, but I wanted to share the pretty, quick, and cheap centerpiece I have on my dining room table.
I {love} antiques, and have had this bowl for several years. I use it for LOTS of things throughout the year, whenever my little brain needs a change. :) This year, I bought cheapo balls on the $1 spot at Target and dropped them in. Love! I like it that it doesn't look planned...and I'm using one of my favorite bowls...and it's easy to move for dinner...and it cost me next to nothing (okay, I'm sure I paid $20 for the bowl MANY years ago, but that's an investment, right?) . Of course it is. It's paid for itself by now.
What I'm throwing out there is that you can put these cheap ornaments in any bowl or basket that you already love and make something totally new out of it. And hey...your kids can mess around with them all they want because they are PLASTIC (don't look it, do they?) and cost $2.50 for a set. So you won't even bat an eye when little fingers approach.
Thanks for stopping by for a quick post.
We're getting so close now to Santa's visit and I.CAN'T. WAIT!
Take care,

Thursday, December 15, 2011

{Christmas Cards for a Cause}

Hello to all, and here's to hoping you're not quite as busy as we have been around here!
As always, the season is flying by, although I feel lighter and not quite as stressed as years past. It's pleasantly surprising and a nice feeling, I have to say. I don't really think I'm doing anything to de-stress, I just went into the holiday season with a better state of mind. I decided I was going to focus on our family, and not all the marketing, materialism, and overspending that I see everywhere. It must be working, and for that I'm thankful!
 Remember the Snowman Soup I made? Well I had some wonderfully usable scraps leftover, along with several stamped images that I didn't need, so I decided to whip up some cards. I used my Cuttlebug embossing folders for the white background, and textured cardstock for the base. (Same as my Snowman Soup labels.)

Each card measures 5.5" x 4", and the base was actually already cut naturally from the Snowman Soup labels. All I really needed to do was add some layering for the sentiment, so they whipped up pretty quickly. Each one will fit in a standard A2 envelope.
Outside of one that I will include with a gift for a friend, I decided that we'll use these to spread some cheer to a recovering soldier at the Bethesda Naval Medical Center. A friend of mine who is a former Marine sent me the address to use, and it seems like there's no way better way than to send something handmade to someone whose sacrifices are beyond my comprehension.
I am using the following address and greeting, for the envelopes. Address it to:
A Recovering American Soldier
c/o Bethesda National Naval Medical Center
8901 Wisconsin Ave.
Bethesda, MD 20889-0001

Hopefully they will be a blessing to those who have sacrificed for our freedom!
Have a great week,

Sunday, December 11, 2011

{Santa Gift Card Holders}

I adore these!

NOT my original idea, but my tweaks. :)
I found this idea a few years ago, and I honestly believe it was floating around throughout the land of paper crafters at that time. I bought gift cards for my parents this year, and instead of just wrapping them in a box, I thought I would dig out some old ideas and make the presentation just a tad cuter. I tweaked this idea by adding the craft stick base, and by making it a gift card holder instead of a candy cane holder. I believe the original one that I saw was adhered to a candy cane, just as a treat holder.
This project uses mainly the Top Note Die from Stampin' Up (one of my favorite dies and so versatile!), and a few circle punches.  I popped up Santa's mustache with dimensionals.
Here's the back...the gift card holder part:
It's actually not the prettiest on the back (hence the 'Merry Christmas' sentiment I added), but it works for a gift card. I just cut another Top Note and trimmed it to fit before adhering it and adding the gift card. It works, since these weren't originally made to be a gift card holder!
If you'd like the full details, shoot me an email...but if you have the Top Note die I guarantee you can figure out on your own pretty quickly. :)
Ho, ho, ho!

Thanks for stopping by!


Thursday, December 8, 2011

{A Fancy 'Bird's Nest'}

My kiddo started collecting Audobon stuffed birds last year, adding one more thing to hoard group of things to keep organized or displayed. They ARE pretty cool....they look like the real bird, have an info tag attached with all kinds of details about it, and when you squeeze them they make the real sound of that bird. So....when you have several, it's pretty interesting to compare their looks and sounds.
Until now, they have been kind of dumped in with other stuffed animals, just for a lack of having a place to display them well. She doesn't really play with them, but would like to have them on display somewhere.
I purchased a stuffed animal net from Amazon a few months ago, thinking this would be the perfect way to display the birds...out of the way...in a corner of her room. After searching everywhere for a net, the one I bought was actually 6 feet (!) in length, and even when I doubled it was waaaaaaaayy too big. It's now stuffed in a cabinet in the garage. :( The whole plan got put aside for a while until Thanksgiving break when I was telling my in-laws about it. I'm not sure why I never thought of this, but why not make my own 'net'?? DUH? How did this little shard of brilliance never enter my mind before this?
So today, this little display problem is finally solved, and I'm so happy with the results. I'm even happier that it was CHEAP. It is Christmas folks and the cash flow is on the down low, if you know what I'm sayin'!
Whatcha think?
This thing is actually fairly heavy, with 10-11 birds in it, so I think it would work great for any small stuffed animals in any little girl's room! Here's how you can make one!

YOU NEED:
2 yards of tulle (<$2/yard)
3M wire hooks
ribbon
rubber bands
scissors


I didn't take pics of each step because honestly, it's pretty simple. I just pinched each end in my fist, about the distance I thought would work for the 'net' in the middle. I wrapped a rubber band around each end where I had pinched it, to keep it in place and hold my 'net' boundary. I did NOT cut anything off the ends until I was all finished and had it hanging up, that way I could determine exactly how wide I needed it to be and wouldn't waste the tulle. I recommend doing the same!
Once you tie 'net' boundary on either side with a rubber band, take your ribbon and really tie it to your satisfaction. I tried a bow (which I'm no good at it and I'm convinced you need a degree in to make them perfectly), but that didn't go well. I ended up knotting my ribbon on either end, with longer strands hanging down. But go for it and by all means, if you're one of the lucky ones with a PhD in tying bows, have at it!!
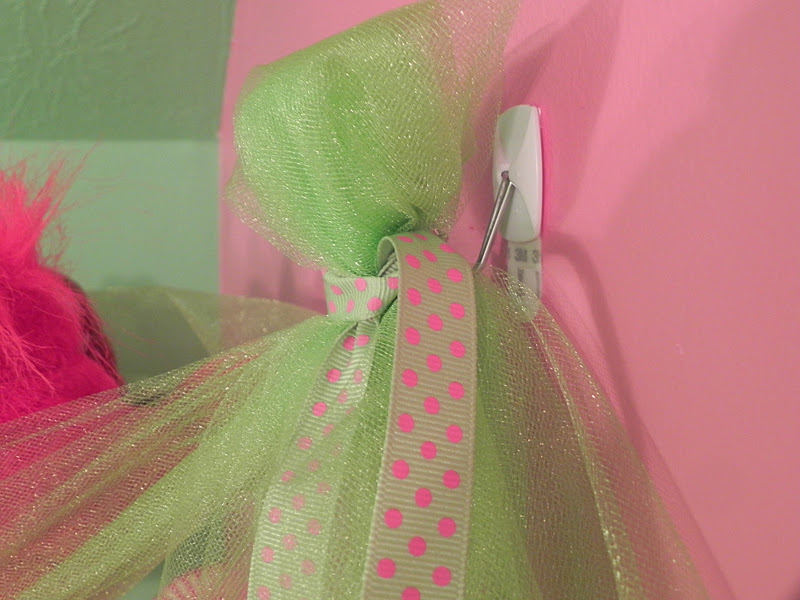
Here's how I ended up hanging it on my 3M hooks. I just slipped my knotted ribbon over the hook.
Does that make sense? See how I gathered some of the tulle at the top of the rubber band, and didn't pull it all the way through? Once you have it hanging up, take your scissors and trim off the extra on one side (if you need to). My corner really wasn't too wide, so I had to trim off about 6" trailing from one side. Yours could be less or more, depending on where you decide to hang it.
That's all! Isn't that simple? I seriously don't know why in the world this didn't come to me before.
{Love} easy and cheap, don't you? (Not to mention that those birds are OFF the floor now!)
Let me know if you have any questions!

Thanks for stopping by!
Link Party


Sunday, December 4, 2011

{Snowman Soup}


There are so many cute versions of Snowman Soup out there! I've only made a few in the past, but this year I decided to put one in the mailbox of each of my fellow teachers at the preschool. I absolutely loooooove mass producing! I got my original idea from Chic 'n Scratch , and then altered it a bit with the size of my bag and dimensions for the cardstock. I had this stamp set that I rarely use but comes in handy every once in a while.
Really...use whatever size bag you have or can find, and then cut your cardstock accordingly. The supplies are inexpensive, and make really cute little holiday gifts to stash in a stocking, on top of a gift, or {in a school mailbox}.
You need: hot chocolate packets, mini candy canes, Hershey kisses, and mini marshmallows. I stamped 20 images and colored them in. Then I cut all the coordinating cardstock and the saying, so everything was ready to assemble in a production line. :) I like working that way! Remember to staple your bags shut BEFORE adhering your sentiment/cardstock.
Here's the saying I used. I printed it from Chic 'n Scratch , but there are several versions out that, or you can make up your own.

I so enjoyed making these! I have wonderful scraps, too, that I used for good. :) I'll be posting those soon!
I can't wait to pass these out next week! Makes me smile!

Take care,


Sunday, November 27, 2011

{Laughs for Christmas}

We made up this little joke jar last year, and anxiously pulled it out last weekend for another year of Christmas laughs. Just a quick little joke out of the jar every day puts a smile on your face!

Here's what you need to make yours!

Plastic container from your recycle bin (this is a parmesan jar)
cardstock
jokes!
 I got my jokes from Holiday Jokes @ Teach Mama and also through a Yahoo search.

Clean out your container, type up or print your jokes, then cut them out and fold up.
Have your cute kiddo(s) make a title for your jar. Ours is called "Christmas Funnies". I just added a belly band of red cardstock for the base, and added her title to the front.
There you go...a little holiday joke jar to spread a smile every day!
 When I come across a new joke, I just jot it on a scrap piece of paper and add it to the mix. Keep the  collection growing! And hey...if you re-use a parmesan jar, it already looks festive. :)

Have a wonderful week!
Tip Junkie handmade projects

Friday, November 18, 2011

{Pieces & Parts Drawstring Bag}

Whew! We are back from our amazing, wonderful, self-indulgent, downright FUN vacation to San Francisco. I'm finally winding down from the chaos that vacation brings, both before and after the trip, and I've been home for 5 days. Vacations will do that to you, no? When I think that this time last week I was in a state of bliss from the incredible day I spent driving the coast with my Honey, I want to go right back and forget about reality. But alas...reality is always here, even if we forget about it for a while. While I absolutely love my life, my home, and my city, there's just nothing like traveling.  I love this photo, because it captures exactly how I felt that day, and how much we both enjoyed our trip. Can't wait to go back!
Just a taste of the awesomeness (is that a word?) of Highway 1.

Now on to my project for today! (If you can focus your thoughts away from the crashing waves, the cool rock formations, the sea air, and the peace that comes from all of that.)
I was cleaning out my small linen closet a month or so ago. This is also where I store my vacuum cleaner, and I realized that when we moved in over a year ago, I actually took all of my vacuum attachments, stuck them in a plastic bag, and hung them on a nail in the closet. Yes...it looks very cool and is super-organized, as you might have guessed. (Wrong.) But that's what you do when you move in and things like vacuum attachments that you NEVER use need a home.
So in that cleaning moment, I decided to whip up a simple drawstring bag so they could STILL hang in that closet, only looking just a little bit better AND I would know what was actually INSIDE the bag once every 2 years when I have occasion to look for those things.
I came up with this drawstring bag:
I used scraps leftover from the Stick Ponies I made for my kiddo's birthday party this summer. I also used scrap ribbon for the drawstring. Now..I wanted it labeled somehow, but since I don't have the super cool Silhouetter or some other e-cutter, I improvised. I used a scrap piece of vinyl that I had left over from my Trick or Treat Photo Hanger . I cut it to the size I wanted, then printed out a label on white cardstock.
I pinned it down, and machine-stitched around it. Voila! Who says I need a Silhouetter? (Okay, I'm just trying to make myself feel better, but bear with me!)

Now my attachments have a home...a LABELED home...and they can live in their ne'er used state in happiness.

Don't you love easy, free projects? If I get to sew, I'm happy. How about you?
Thanks for stopping by!

Tuesday, November 15, 2011

{Rag Quilt Teacher Gift Set}

I actually made this several months ago, and now plan to give it to my daughter's teacher for Christmas. I saw the fabric on clearance one afternoon and picked up some without knowing what I would use it for. This is a nice little carry-all bag, and I love the studious owls!
I cut all the squares for both the inside and outside of the bag with my Cuttlebug, using my Stampin' Up Scallop Square Die. I love the rag quilt look that it creates. You can check out some of my other scallop projects by looking under Scallop Square Die in my sidebar.
This is a very soft and squishy bag, but also boxey. I lined the bottom with 2 pieces of cereal box cardboard (adhered together), then made a matching sleeve to go over it. (If Vera Bradley can put cardboard in the base of her bags, so can I - hee, hee.) 

I added the little wallet/pouch much later. It's extremely simple and very handy. I have one myself that I don't use for money, but I keep it in my purse just to house my craft store coupons! (I was tired of fishing them out, and since I'm at the craft store A LOT, it really comes in handy. Can I get an amen?!)
The top just folds down...over your coupons. :)
Then I just recently added this little coffee cozy, after seeing the tutorial over at Skip to my Lou . It was VERY easy to follow, and it used up the remaining small pieces of owl fabric I had left over. I'm not sure my daughter's amazing teacher even drinks coffee, but it's too cute to not add in!
Cute, no? My "button" on the cozy is actually a cloth covered brad. It was the only thing I had lying around that matched! :)
So here's the final set....
We will probably add some scrapbooking supplies to the bag (she loves to scrapbook, just like I do!), and possibly a small gift card in the pouch. I hope she loves it!
If you have any questions, please let me know.
Thanks for stopping by my little corner of the web!