Monday, June 27, 2011

{Horse Birthday Party}

My big girl turned 7 today (!), and I have no idea how the time has gone by so quickly. No one tells you that it will go so fast, and regardless how much you try to treasure or capture every moment, it still flies by.  On a 7th birthday you're left in a gasp, trying to remember that tiny baby you held in your arms during what seems like such a short time ago. Around here, I try to cherish every birthday by making it as special as possible. She has much more detailed parties than I certainly ever had, and I'm thankful for that. It's not that they are expensive or over-the-top (in my opinion), but simply planned. Thought out. Special. :)
She's wildly in love with horses, so that was her theme choice this year. I love doing things in themes! She had her first real "friends" birthday party one Saturday, and our annual "family" party get-together the day before her actual birthday. It was SO much fun planning for her classmate party!
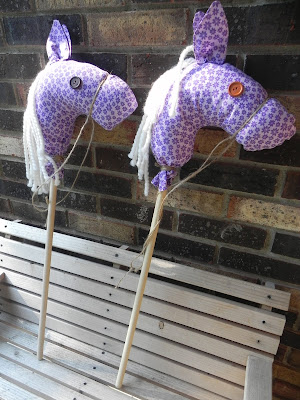
We started our brainstorming with ideas for games and  favors. She loves having races, relays...something physical, so I decided to make stick horses for each girl as a party favor, and to use during the party as well. They were a HUGE hit and I was so happy with that!
I came up with the pattern and assembly after looking at the construction on a few other handmade stick horses. You can see my full tutorial here to make your own. They are very simple and I used clearance fabric for all of them.
I originally made nametags for each horse, but then we decided that each girl could just select a pony when she arrived. It worked out well that way.
Guests were greeted by our longtime pal "Chip".
I made this banner using my die-cut machine and chipboard letters from Target's Dollar Spot.
 As everyone arrived and settled in, the girls had free play time with a basket of horse-themed stories from our bookshelf and my daughter's horse corral and horses. They LOVED that more than I would have imagined. :)
Next, the girls each decorated a sparkly foam horseshoe to hang in their bedrooms. We were originally going to use wooden horseshoes, but they were very small and just not what we wanted. I traced these from a horseshoe pattern I found somewhere online, punched holes with my crop-a-dile, and laced some ribbon through. The girls decorated them with a huge bag of sequins I had on hand.
 They loved it!
We hid 23 small ponies (thank you Oriental Trading Co.!) around the yard, based on a story we made up about finding the lost magical ponies. The girls LOVED hunting these down! The last one was tricky to find, and they were soooooo into the imagination of it all. They were a joy to watch! Each girl got a pink Starburst for their efforts, as well as horse sticker as a "badge".
Here they are counting the lost ponies they had collected thus far:
We had fun relay races with our stick horses next. The girls teamed up in 3's, and they raced on their stick horses to deliver an apple to a stuffed horse on the other side. They had obstacles like fun noodles to jump over (from the $1 Store), pylons to navigate, and tricks like running backwards, skipping, etc. So much fun!
Our party was in the afternoon, so we served cupcakes and ice cream cups, as well as snacks well-suited to real horses. :) Apples, carrots, and "oats" (aka: Chex Mix).


We made the cupcakes ourselves, as well as the toppers. I used the stickers from a large roll of miscellaneous horse stickers I ordered from Oriental Trading Co., and my trusty circle and scallop circle punches. I adhered them to toothpicks and voila.
This is the cake we had for our large family party:

I had it iced and titled, then we added Schleich horses as an extra gift for her growing collection.

We finished off the fun for her "friend" party with my daughter's first pinata. Doesn't it seem a bit ironic that we ended a horse party by actually destroying a horse? :) At any rate, the girls thoroughly enjoyed themselves, my special girl most of all.
Now that all the birthday festivities are over, it's time to go shopping with all that birthday money! :)
Have a wonderful week,

Linking up to these fun parties:


Tuesday, June 21, 2011

{Our First Container Garden!}

I'm just a bit too excited about growing food for the very first time, but I can't help it! My daughter has been begging me to grow tomatoes, and I love her enthusiasm. Keep in mind, she does not like tomatoes :), but she is determined that we will grow them and make homemade tomato soup (which she also doesn't like). I'm not sure there will be any soup made, but we ARE growing tomatoes and it's such a wonderful feeling I can't believe I've been missing out on it all these years!

Cherry Tomatoes
 I was initially motivated strictly by the learning opportunity that growing would provide, but now...it's just fun. (Yes, I'm giddy!)  I was super nervous though, and with other outside projects planned, I didn't want to section off a part of our land this year. We also have lots and lots of critters coming through our yard all the time...you name it, we see it. Even coyotes. I didn't want them to all be eaten for our first attempt. So...I opted for tomato plants with the magical words "Great for Containers!"  We bought 4 plants at Lowes, potted them, and they are sitting on our deck growing so very happily. I love looking at them! One is a cherry tomato plant, the rest are medium tomatoes.
To keep my kiddo involved and feed her passion for science, I came up with a recording sheet that she can use weekly. You can download it  here: Tomato Growth Recording Sheet  and change dates, number of plants, etc., to fit your own garden plan.

I've already got a garden plan for next year running through my mind!
Thanks for stopping by!

Friday, June 17, 2011

{Father's Day Love}

We love to do something just a little homemade for Father's Day, so this year we came up with a "love jar" for my main squeeze - the most incredible husband and amazing father.

My sweet girl and I each came up with reasons we love him so much and jotted them down on little scrap pieces of white cardstock that she trimmed with fancy scissors. We folded them up and added them to a plastic craft jar. We stopped at 42, because that's the number of his favorite football player. :)
I decorated the outside, and although a super cute font would have been the finishing touch, we decided we wanted it to be "all us". You can't beat the personalization of a handwritten tag. :)

So what are you giving the amazing man in your life this Sunday?
Enjoy your weekend!

Monday, June 13, 2011

{Stick Pony Tutorial}

My sweet girl is turning 7 in just a couple of weeks, and her party theme this year is horses. She loves all things "horses" at the moment, so all the party prep is in the works at the moment. We love to do themed parties - It's so much fun getting creative with all the details. I'll be sure to share all the party specifics afterward, but for now I wanted to share my tutorial for the homemade stick ponies I made for her party with her classmates. We plan to have stick pony races of all varieties, so the stick ponies will double as a favor for each girl, as well as part of our party fun!  I looked around for homemade stick ponies, got a few ideas, and here's what I came up with. They are really simple to make! The hardest part was getting my pattern just right, and that still only took a couple of tries and testing on some scrap fabric.  This is one of my first tutorials, so I hope it's clear for you! If you have questions or I've left something out, I apologize in advance and please email me so I can correct it! :)
Here's what you need:
2 buttons
1/2yd fabric
 sewing machine
thread
poly-fill
3ft dowel rod at about 1/2" diameter
yarn of your choice
needle
jute twine or ribbon
  a horse head/ears pattern.

I drew my own horse head pattern on old file folders and made one or two samples to make sure the sizing was right. I am no artist! :) I really just free-handed a horse head until it looked right.
Here goes! :)
1. Trace the horse head and 2 ears onto your fabric, with right sides together. Pin in a couple of spots for security and cut them out.

2. Make the ears:  You will have 4 ear pieces all together, to make 2 full ears. Pin ear pieces in pairs, right sides together. Machine stitch on two sides, then turn right side out. Top stitch the bottom closed and all the way around. Hand stitch a little tuck in the bottom of each ear so they look like this:

3. Mark a spot on each horse head piece where your button eye will go, and hand stitch each one on.
 4. Cut several yarn  pieces about 7"-8" long each. I would say my horses have about 12 strands per head, but use as many as you like. I had to make 9-10 of them, so I skimped a little and still used a whole skein. I think they look great with a heavy mane, and I would definitely increase mine if I were only making one or two. This is what I used:

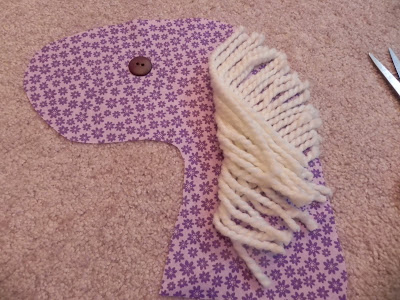
 5. Now it's time to sew your horse heads together. Lay out one horse head, right side up. Line up your yarn pieces (the mane) flush with the neck of the horse head, laying them over the fabric so that they will actually be stitched up into the horse head. I made sure that the mane also went up through to the ears as well.  Once you have them there snugly together, fold up the ends of the strands so they are INSIDE the neck like this:

Once you have your horse head sewn together, then the mane will be where it should be once you turn it right side out.

6. Lay the second horse head piece on top of the first one, right sides together, and pin securely along the sides. 

Machine stitch all around, about 1/4" seam allowance, leaving the neck open. Clip your curves and turn right side out.

7. Hem the neck of your horse head and you will be ready for the stuffing. Stuff your horse head pretty firmly, although not all the way to the bottom of the neck. Play around with it. You can always take some out if needed. You need some space down at the neck for the stick, hot glue, and tying. It will now look like this:
We still need to add the ears, reins, and stick. You're almost done!

8. Hand sew each ear to each side of the horse head. I considered putting these inside along with the mane strands, but I liked the way they looked better doing it this way. By all means, go with what you prefer! :) I took a pic from the back, just to help you see how closely I sewed them together on the head.

9. Cut a 36" (1/2" diameter) dowel rod down to about 28" and sand the end smooth. Place your stick up inside the horse head, trying to keep it squarely between lots of poly-fil so it's not just ramming right into your bare fabric. Add hot glue to the stick, just under the horse neck flap, and press the neck fabric down tightly. Add the jute twine here, knotting it twice, and criss-crossing it tightly around the base of the horse neck.

 10. Now cut a length of jute twine and knot it around the horse's muzzle, just a little too tightly. (You don't want to squeeze the horse's muzzle and make it look funny.) Pull back the loose strand on each side of the head and knot that again to make the reins. I'm not sure how best to get a pic of this, so hopefully you'll understand it by seeing the finished product.
Voila! You have super cute homemade stick ponies! These will be our party favors for about 9 girls. I purchased and used a little over 2 yards of fabric (clearance), the buttons, and the dowel rods @ $1.29each at Hobby Lobby. The thread, twine, and poly-fil I had on hand. All told, I spent about $16 on 9 stick ponies. The buttons were the most expensive. The ones I had just weren't big enough to look right. I used about 3/4" buttons on these stick ponies.
I hope you enjoyed this tutorial and will try one (or 10!) of these on your own. I'm happy with how they turned out, and I'd love to know what you think, too!
Have a great day,
Linking up over here:


Creative Itch


Saturday, June 4, 2011

{Weekly Summer Wipe-Off Planner}

Only 2 more days 'til school's out!!! YIPPEE!!! Do you loooove having your kiddo(s) home for the summer as much as I do???! I know it will be over only too fast, so we have a million fun things planned and I'm going to savor each moment. My baby goes to first grade next year, which means she will be in school ALL DAY for the very first time. (sniff, sniff)
Crying aside, because I'm a teacher and I live for learning every day, I try to create a light but somewhat structured learning plan for the summer. It's important to keep those little brains-a-workin'. One way I plan to stay on track this summer is by sticking to a schedule of completing ONE "smarty" activity every day. These are always simple, since this IS summer, but nevertheless they are there. We have a fun "theme" for each day:
 Math Monday  
Terrific Tuesday   
Wacky or Water Wednesday (a guaranteed pool day!)  
Thinking Thursday
Funky Friday

The goal for me is to stick to my one-a-day learning, reinforcement, review...whatever it might be. Mostly these are short 15 min.-ish activities (for my soon-to-be 7 yr old). Telling time, addition and subtraction facts, journaling 3x/week, map work, and loads of reading (which we don't have to work in because she's always got her nose in a book anyway). If your kiddo is resistant to reading, check out this fun idea.

Okay...I'm getting long-winded here! To stay on track and keep stick-it notes off of every surface in my kitchen, I grabbed an unused frame that's been patiently waiting in the wings.I stuck in a super-simple grid I made up in Word.
I printed it on creamy cardstock, plopped it in the frame, and added some sticky velcro to the frame and the pen to create a cute wipe-off board. It's just enough room for me to write ONE learning reminder for the day, but it will really help me to stay on track. I need a note for everything, and I didn't want learning activities to get mixed up in my regular everyday to-do's. This keeps them separate, clear, and my kiddo can read them and stay updated, too. It's only made for 5 days, and I liked the extra room for notes or other reminders about things we've worked on.
You can download the 5-Day Planner here . I used "Freeze" for my original font from Free Scrapbook Fonts
but no matter what I try I can't them to transfer to Scribd that way. Sorry! So the font is plain, but once you download it you could change it any way you like.  If I figure out the problem, I'll try to correct it...or if a techie can help, that would be great, too! :)

Only 2 more days....I can't wait!
Take care,