My sweet girl is turning 7 in just a couple of weeks, and her party theme this year is horses. She loves all things "horses" at the moment, so all the party prep is in the works at the moment. We love to do themed parties - It's so much fun getting creative with all the details. I'll be sure to share all the party specifics afterward, but for now I wanted to share my tutorial for the homemade stick ponies I made for her party with her classmates. We plan to have stick pony races of all varieties, so the stick ponies will double as a favor for each girl, as well as part of our party fun! I looked around for homemade stick ponies, got a few ideas, and here's what I came up with. They are really simple to make! The hardest part was getting my pattern just right, and that still only took a couple of tries and testing on some scrap fabric. This is one of my first tutorials, so I hope it's clear for you! If you have questions or I've left something out, I apologize in advance and please email me so I can correct it! :)

2 buttons
1/2yd fabric
sewing machine
thread
poly-fill
3ft dowel rod at about 1/2" diameter
yarn of your choice
needle
jute twine or ribbon
a horse head/ears pattern.
1/2yd fabric
sewing machine
thread
poly-fill
3ft dowel rod at about 1/2" diameter
yarn of your choice
needle
jute twine or ribbon
a horse head/ears pattern.

I drew my own horse head pattern on old file folders and made one or two samples to make sure the sizing was right. I am no artist! :) I really just free-handed a horse head until it looked right.
Here goes! :)
1. Trace the horse head and 2 ears onto your fabric, with right sides together. Pin in a couple of spots for security and cut them out.

2. Make the ears: You will have 4 ear pieces all together, to make 2 full ears. Pin ear pieces in pairs, right sides together. Machine stitch on two sides, then turn right side out. Top stitch the bottom closed and all the way around. Hand stitch a little tuck in the bottom of each ear so they look like this:

3. Mark a spot on each horse head piece where your button eye will go, and hand stitch each one on.

4. Cut several yarn pieces about 7"-8" long each. I would say my horses have about 12 strands per head, but use as many as you like. I had to make 9-10 of them, so I skimped a little and still used a whole skein. I think they look great with a heavy mane, and I would definitely increase mine if I were only making one or two. This is what I used:

5. Now it's time to sew your horse heads together. Lay out one horse head, right side up. Line up your yarn pieces (the mane) flush with the neck of the horse head, laying them over the fabric so that they will actually be stitched up into the horse head. I made sure that the mane also went up through to the ears as well. Once you have them there snugly together, fold up the ends of the strands so they are INSIDE the neck like this:

Once you have your horse head sewn together, then the mane will be where it should be once you turn it right side out.
6. Lay the second horse head piece on top of the first one, right sides together, and pin securely along the sides.

Machine stitch all around, about 1/4" seam allowance, leaving the neck open. Clip your curves and turn right side out.
7. Hem the neck of your horse head and you will be ready for the stuffing. Stuff your horse head pretty firmly, although not all the way to the bottom of the neck. Play around with it. You can always take some out if needed. You need some space down at the neck for the stick, hot glue, and tying. It will now look like this:

We still need to add the ears, reins, and stick. You're almost done!
8. Hand sew each ear to each side of the horse head. I considered putting these inside along with the mane strands, but I liked the way they looked better doing it this way. By all means, go with what you prefer! :) I took a pic from the back, just to help you see how closely I sewed them together on the head.


9. Cut a 36" (1/2" diameter) dowel rod down to about 28" and sand the end smooth. Place your stick up inside the horse head, trying to keep it squarely between lots of poly-fil so it's not just ramming right into your bare fabric. Add hot glue to the stick, just under the horse neck flap, and press the neck fabric down tightly. Add the jute twine here, knotting it twice, and criss-crossing it tightly around the base of the horse neck.


10. Now cut a length of jute twine and knot it around the horse's muzzle, just a little too tightly. (You don't want to squeeze the horse's muzzle and make it look funny.) Pull back the loose strand on each side of the head and knot that again to make the reins. I'm not sure how best to get a pic of this, so hopefully you'll understand it by seeing the finished product.

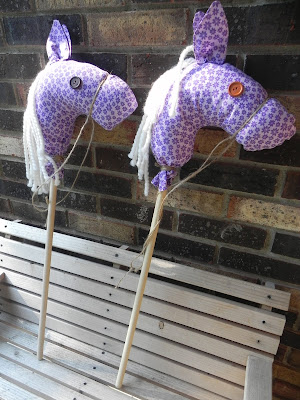 Voila! You have super cute homemade stick ponies! These will be our party favors for about 9 girls. I purchased and used a little over 2 yards of fabric (clearance), the buttons, and the dowel rods @ $1.29each at Hobby Lobby. The thread, twine, and poly-fil I had on hand. All told, I spent about $16 on 9 stick ponies. The buttons were the most expensive. The ones I had just weren't big enough to look right. I used about 3/4" buttons on these stick ponies.


I hope you enjoyed this tutorial and will try one (or 10!) of these on your own. I'm happy with how they turned out, and I'd love to know what you think, too!
Have a great day,

Linking up over here:


Very cute. Thanks for the detailed instructions and a price break down! We are making these for my daughters bday party. Thanks so much!
ReplyDeleteI was going to do sock stick ponies for my girls' party but I think these are so much cuter! Thanks for the tutorial and the price break down as well. I am a beginner at sewing so I'm thinking I should allow myself plenty of time to make a dozen. Maybe two weeks? Wish me luck!
ReplyDeleteLoved this idea would be fun to make some! Thank you so much for showing us how!
ReplyDeleteomg, they are so cute. my daughter's pony party is on Sat and I just found this. I am going to have some busy sewing ahead of me this week! thank you for the tutorial!
ReplyDeleteI’m impressed, I must say. Really rarely do I encounter a blog that’s both educative and entertaining, and let me tell you, you have hit the nail on the head. Your idea is outstanding; the issue is something that not enough people are speaking intelligently about. I am very happy that I stumbled across this in my search for something relating to this.
ReplyDeleteWisata Jawa
Java Travel